
Sourdough Bread
Servings 1 2lb loaf
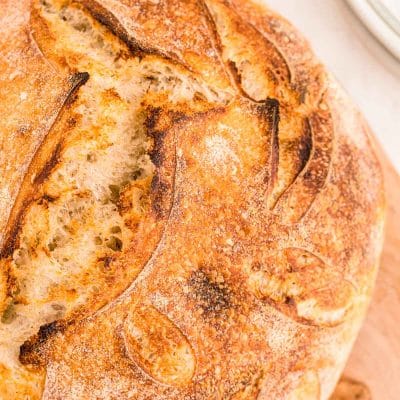
This Sourdough Bread Recipe is the ultimate step-by-step guide on how to create the perfect homemade loaf of Sourdough Bread from scratch!
Ingredients
- 400 grams bread flour
- 200 grams whole wheat flour
- 460 grams filtered water
- 90 grams ripe sourdough starter 8-12 hours after last feeding
- 12 grams salt
Instructions
- In a large mixing bowl, combine the flours and water and stir to combine as best as possible (the mixture will be “shaggy”). Cover with plastic wrap and set in a warm location for 45 minutes.400 grams bread flour, 200 grams whole wheat flour, 460 grams filtered water
- After 45 minutes (this gives the mixture time to autolyse), add the starter and salt to the flour/water mixture and stir well.90 grams ripe sourdough starter, 12 grams salt
- Cover with plastic wrap and set aside for 4 to 6 hours (see next step for steps to strengthen dough during the 6 hours).
- We will perform a set of folds to strengthen the dough during the first two hours of this “bulk fermentation” time.
- Every 30 minutes, uncover the bowl of dough. Dip your hands into warm water (this keeps the dough from sticking to your hands). Slide your hands down around the top of the dough. Lift this side of the dough up and fold it down over the side opposite. Turn the bowl 90 degrees and repeat lifting and folding until you have lifted and folded each of the four sides of the dough. Replace the plastic wrap and leave the dough to set for another 30 minutes.
- Repeat twice more.
- After you’ve completed three sets of lifting and folding the dough, do a final set of dough-strengthening folds. Slide your dampened hands around the dough sides (right and left). Lift the dough straight up from the bowl. The ends will dangle down and stretch. Do not let the dough break. Set the dough straight back down on itself. Rotate the bowl 90 degrees and repeat, completing four lift and stretch sets.
- Now let the dough sit for about four more hours undisturbed to complete bulk fermentation.
- At this time, the dough should be smooth and rounded, holding its shape with somewhat of a dome toward the edges of the bowl. Large bubbles may appear under the surface of the bread.
- Now it’s time to shape the bread into a loaf. We will shape one round loaf but you can divide the dough at this point and make two smaller loaves or shape them into ovals, baguettes, or whatever you desire.
- Place the liner in the banneton and sprinkle with rice flour (the rice flour doesn’t have gluten so it won’t stick to the bread dough).
- Lift the dough from the bowl and place it into the basket, flipping it upside down so that the smooth “top” of the dough is now face down in the basket. Tuck the excess dough onto itself to form a neat upside-down loaf.
- Sprinkle rice flour on top of the dough to prevent it from sticking to the plastic wrap and also to dust the baking dish when it flips over into the pan at baking time.
- Wrap the entire basket with plastic wrap so that it is sealed up. Place in the refrigerator overnight or for at least 12 hours.
- When it’s time to bake, place the Dutch oven into the oven and preheat to 500°F. Allow the oven and Dutch oven to heat at this temperature for at least 30 minutes, but preferably 1 hour.
- Remove the dough from the refrigerator and discard the plastic wrap.
- Carefully remove the hot Dutch oven from the oven. Then quickly flip the banneton basket upside down to dump the dough into the center of the Dutch oven.
- Score the loaf with the lame. This gives the bread an area for steam to escape and the loaf to puff during baking.
- Quickly place the lid on the Dutch oven and return it to the oven. Bake for 20 minutes at 500°F.
- Reduce the oven temperature to 450°F and carefully remove the lid - turning the lid away from you so that the steam doesn’t rise out toward you.
- Continue baking for about 10 minutes longer or until the crust is deep golden brown.
- Remove from the oven and transfer the loaf to a cooling rack to cool completely.
Notes
- Store cooled bread in an airtight container once it has been cut into. Bread is most delicious the first day after baking.
- Rice Flour is also recommended since it's the best choice for dusting bannetons for sourdough because it's gluten-free and doesn't absorb moisture in the same way that all-purpose or bread flour does. It is not actually used in the dough itself.
- Bread flour is preferred to all-purpose flour here, but you can use all-purpose if that’s all you have. Whole wheat or whole rye is fine. You can do 100% bread flour or really any combination.
- This is a 77% hydration recipe - to find the hydration, you’re dividing the amount of water by the amount of flour. Stick between 70% and 80% hydration - the lower the hydration, the easier the bread is to work with, but the higher hydration, the yummier. 🤣 (Higher hydration has a more open crumb and a thinner/crispier crust). We’re also using 15% starter and 2% salt.
- The step to autolyze the dough seems to help get the gluten developing and make the dough more pliable from the start. This method worked best for me.
- There are two basic techniques of the “stretch and folds” - the easy over method is done when the dough is just starting to develop and the lift and set down method is done later in the process when the dough is much more pliable and stretchy. The stretches and folds help the gluten develop, strengthen the dough, and add air.
- Overnight proofing in the fridge helps the dough develop more flavor and slows down the fermentation process. It’s pretty flexible. You can leave the dough in the fridge for 12 to 18 hours at least if you need flexibility in baking time.
- The lame and the proofing baskets make a world of difference. Go ahead and invest in these; they’re worth the results.
Nutrition
Calories: 2206kcal | Carbohydrates: 451g | Protein: 77g | Fat: 12g | Saturated Fat: 2g | Polyunsaturated Fat: 5g | Monounsaturated Fat: 1g | Sodium: 4687mg | Potassium: 1127mg | Fiber: 32g | Sugar: 2g | Vitamin A: 26IU | Calcium: 145mg | Iron: 11mg
Find it online: www.sugarandsoul.co/sourdough-bread-recipe/