
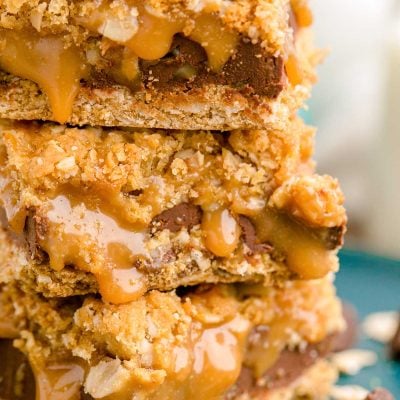
Easy Carmelitas (Caramel Oatmeal Bars)

Carmelitas sandwich a gooey chocolate and caramel center between an oatmeal-brown sugar crust for an easy dessert that everyone will devour! Prep this treat in just 15 minutes!
Dessert Bars Worth Indulging In
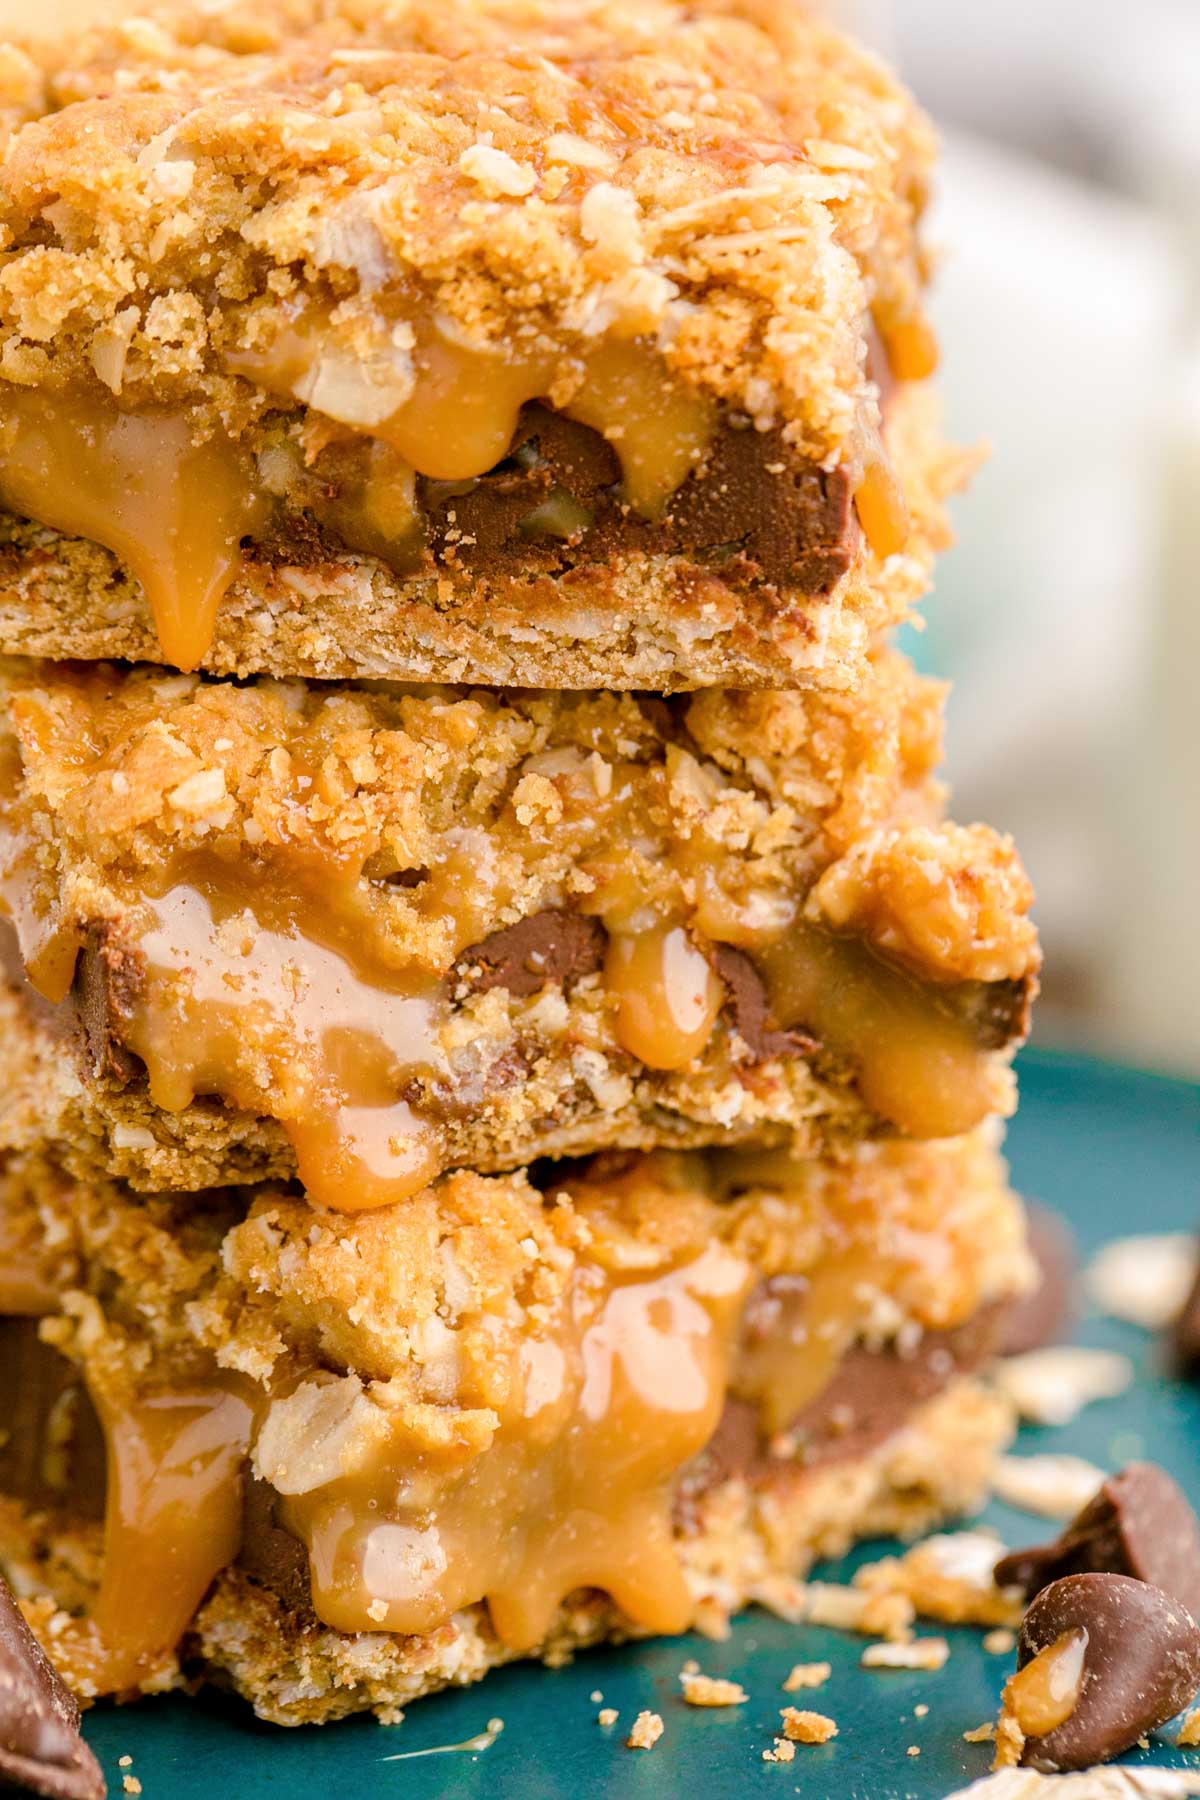
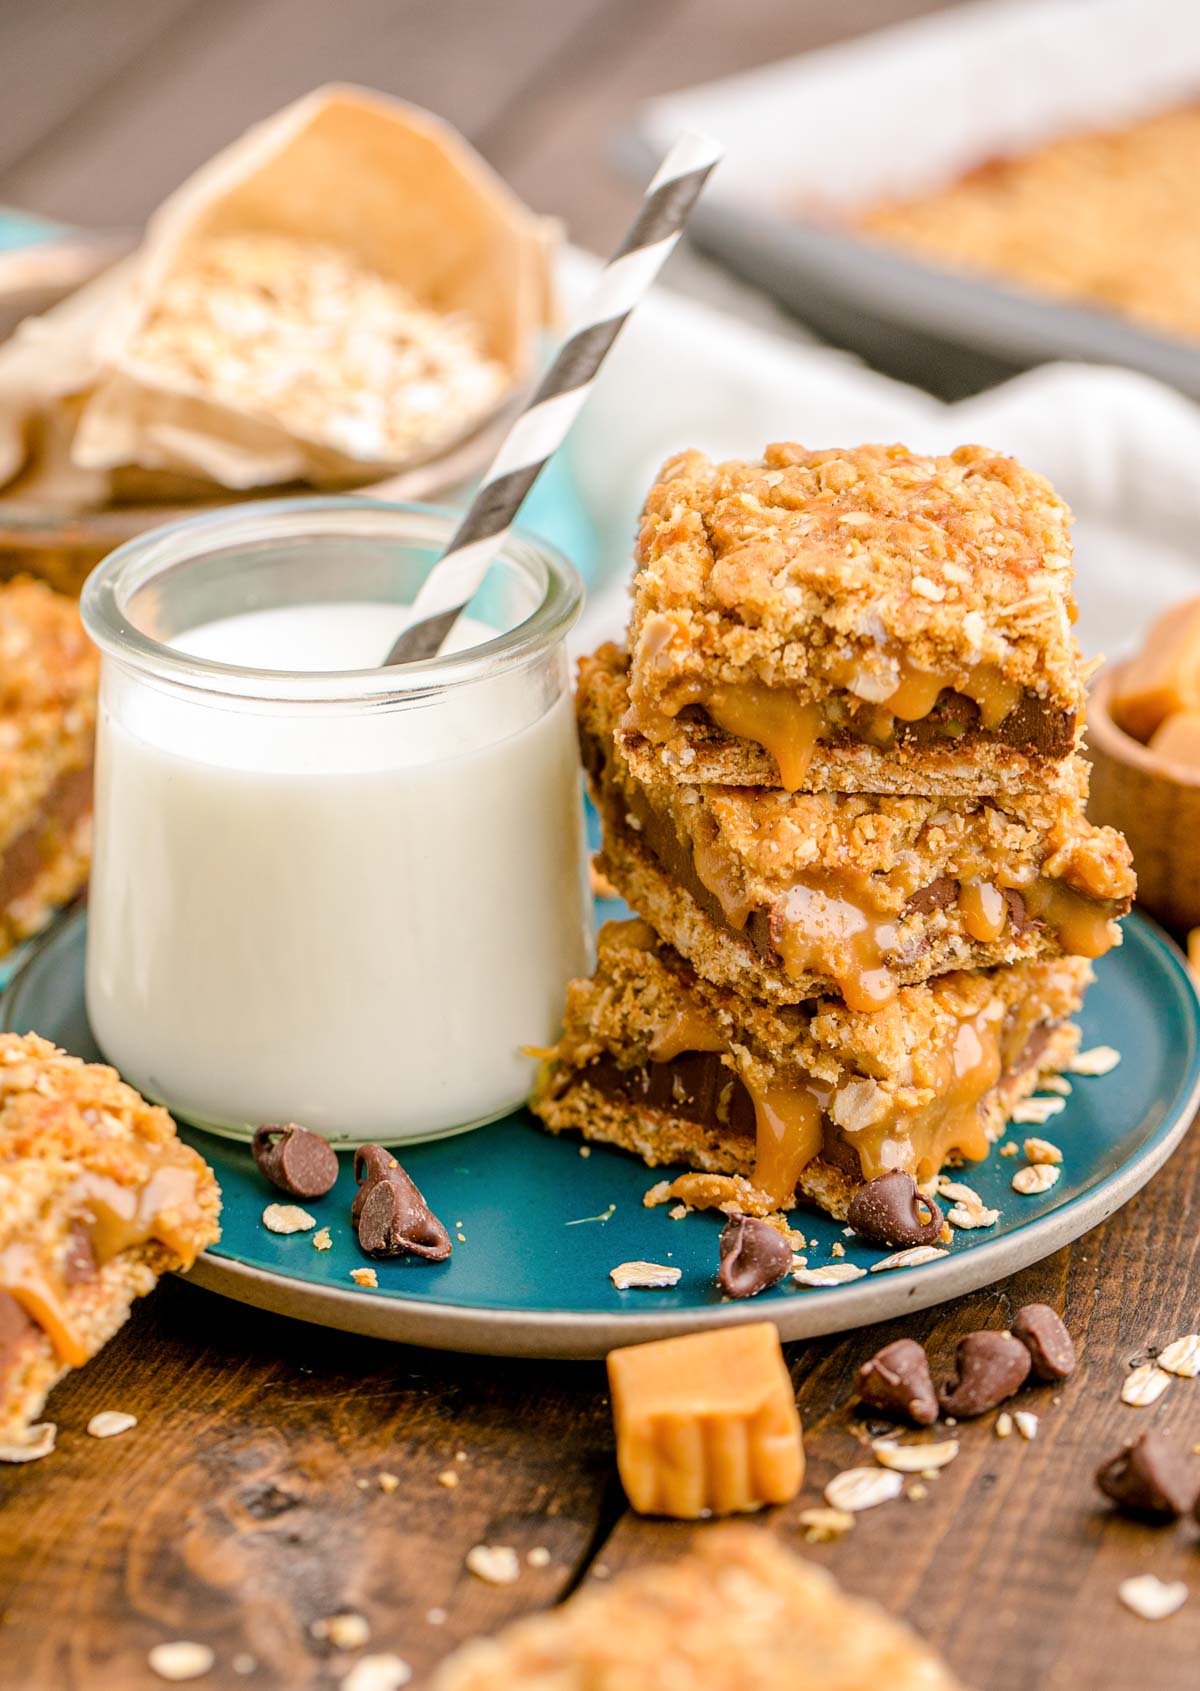
These Carmelitas have a soft oatmeal cookie-like crust on the top and bottom to seal in a rich, creamy caramel layer! The combination of warm brown sugar, buttery caramel, and sweet chocolate chips pair together to bring you a deliciously cozy dessert you’ll want to share with everyone!
Your first bite into these Carmelitas will be one you won’t soon forget! Their gooey caramel center and chewy crust combine for a decadent treat that will quickly have you (and everyone else!) reaching for seconds!
I love that this recipe uses store-bought chewy caramels to whip up that amazing caramel layer. While the rest of the bars come together easily using ingredients you likely have on hand.
You just can’t beat treats that have an out-of-this-world taste yet use easy ingredients and only 15 minutes of prep time, right?!
Rebecca’s Recipe Review
Taste: Rich bars with warm brown sugar, buttery caramel, and sweet chocolate.
Texture: Gooey center with a chewy crust.
Ease: 4/10
Pros: Takes only 15 minutes to prep a crowd-pleasing treat.
Cons: None.
Would I Make This Again? Yes!

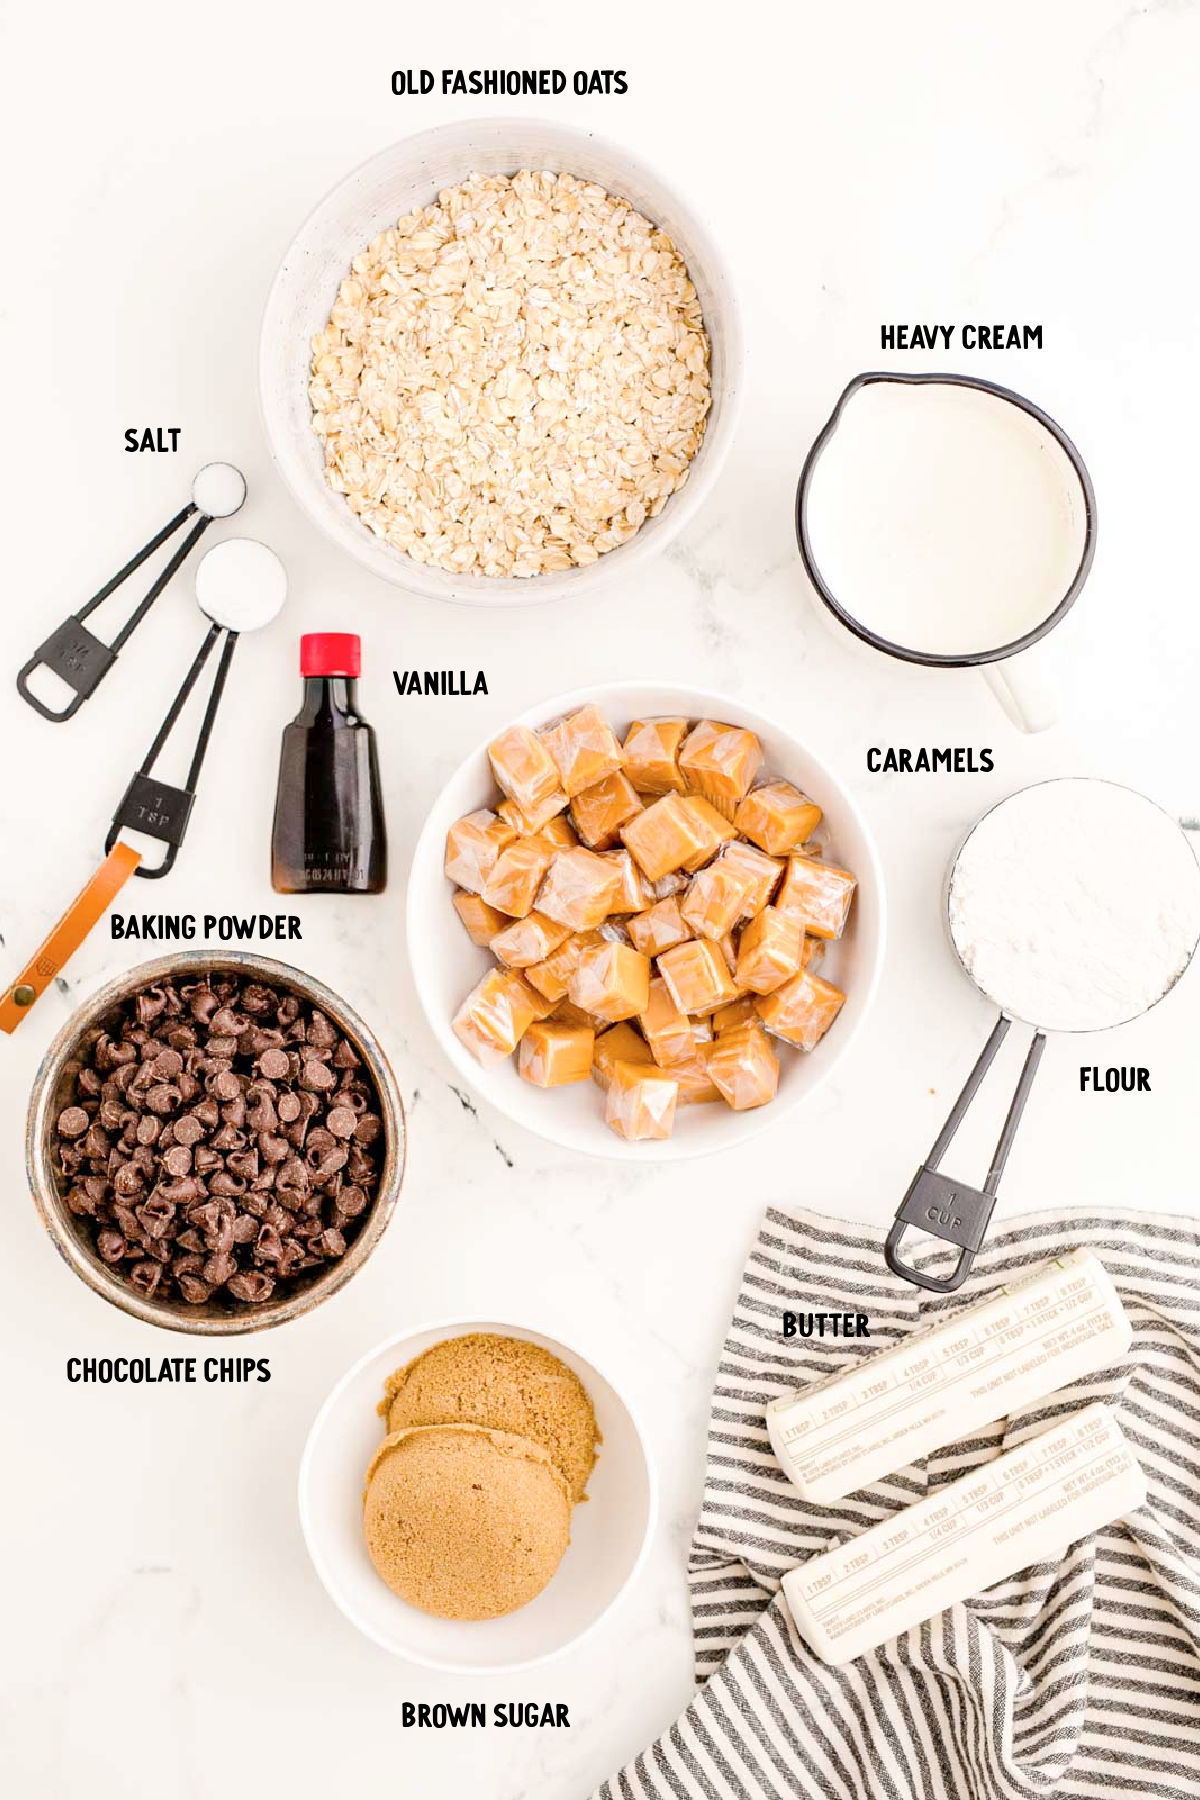
Ingredients For Carmelitas
Make up a pan of these scrumptious bars by following this easy Carmelitas Recipe! To begin, you’ll start by making the simple crust, which is made with salted butter, light brown sugar, vanilla extract, all-purpose flour, rolled oats or old-fashioned oats, baking soda, and salt.
After half of the crust is pressed into the pan and baked you’ll prepare the caramel filling by melting the caramel squares, heavy cream, and salt together. Sprinkle chocolate chips over the baked crust and then pour the melted caramel sauce over them to create the gooey, sweet filling.
Then all that’s left to do is put the top layer of crust on before baking the bars up to a light golden brown!
If you’re interested in mixing in some add-ins into this already delicious recipe you could add sea salt to the caramel layer for more of a salted caramel flavor. You could also add some shredded coconut or even chopped pecans to the flour mixture for added texture and flavor!
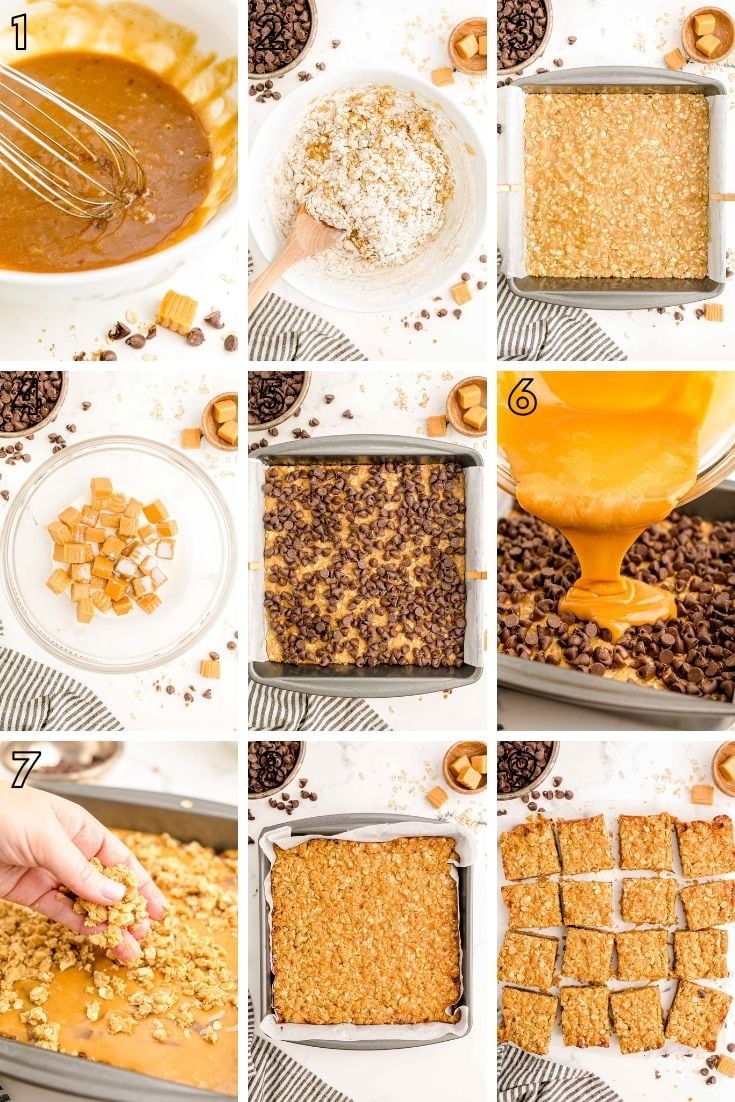
How To Make Carmelitas Cookie Bars
- Melt the butter and then whisk in the brown sugar and vanilla.
- Stir in the flour, oats, baking soda, and salt. Feel free to use a pastry cutter to crumble it all together.
- Press half of this mixture into a greased and lined 8×8-inch baking pan. Bake the crust.
- Prepare the filling by heating up the caramels, cream, and salt until the mixture is smooth.
- Remove the crust and evenly sprinkle the chocolate chips over it.
- Pour the caramel sauce over the layer of chocolate chips.
- Cover the caramel sauce layer with the remaining crust mixture. Use your hands to lightly tap it down gently.
- Bake the Carmelitas until they’re lightly browned.
- Cool the pan on a wire rack and allow the bars to cool completely before slicing.
Rebecca’s Tips
- The texture of these bars is much better if you stick to using rolled or old-fashioned oats.
- You can easily double this recipe; just bake it in a 9×13-inch pan if you decide to double the recipe.
- You can swap out the brown sugar for white sugar, and it should work just fine. I do, however, find that the brown sugar gives it more of a caramelly flavor.
- Caramel sauce from a jar is generally too thin to use in this recipe. If you were able to find a really thick pre-made sauce, then you could certainly try using that.
- I used Kraft caramels (affiliate link), the ones that are wrapped in clear plastic.
- You can pop the pan of Carmelita Bars in the refrigerator for about 3 hours to speed up the cooling process.
- Make sure to only heat the caramel mixture until smooth, you don’t want to overheat it or it could become to chewy for the bars.
How To Store Carmelitas
Keep these Caramel Oatmeal Bars stored in an airtight container at room temperature and eat them within a week. You could also freeze them for up to 4 months
Here are more delicious dessert bar recipes to bake up:
- Oreo Magic Bars (7 Layer Bars) – Oreo cookies, chocolate chunks, coconut, nuts, and M&Ms!
- Key Lime Bars – Buttery shortbread crust with a layer of soft lime filling delivers a citrusy, sweet treat!
- Strawberry Cheesecake Bars – Creamy cheesecake, strawberry filling, and oatmeal crumble!
- Chocolate Chip Cookie Bars – Thick, sweet, and chewy bars filled with chocolate chips and M&Ms!
- Peanut Butter S’mores Bars – Made with graham crackers, peanut butter cookies, marshmallows, chocolate, and candy!
Did You Make This Recipe?
If you’ve tried this recipe, please let leave a review in the comments below. I love hearing from you! Don’t forget to tag me – @sugarandsoulco – on Instagram and Pinterest with your photos, or join our Sugar & Soul Show-offs Community and share them there.
Carmelitas
Equipment
- 8X8-inch baking pan
- Microwave safe bowl
- Parchment paper
- Pastry cutter
- Measuring Cups
- Measuring spoons
Ingredients
- ¾ cup salted butter melted
- ⅔ cup light brown sugar packed
- 1 Tablespoon vanilla extract
- 1¼ cup all-purpose flour
- 1¼ cup rolled oats or old fashioned oats
- 1 teaspoon baking soda
- ½ teaspoon salt divided
- 40 chewy caramel squares such as Kraft brand
- ⅓ cup heavy cream
- 1½ cup semi-sweet chocolate chips
Instructions
- Preheat the oven to 350°F and line an 8×8-inch baking pan with parchment paper and spray the parchment with nonstick spray. Set aside.
- In a large microwave-safe bowl, melt the butter, then whisk in the brown sugar and vanilla extract.¾ cup salted butter, ⅔ cup light brown sugar, 1 Tablespoon vanilla extract
- Stir in the flour, oats, baking soda, and ¼ teaspoon salt until a crumble forms.1¼ cup all-purpose flour, 1¼ cup rolled oats or old fashioned oats, 1 teaspoon baking soda, ½ teaspoon salt
- Add half of the oat mixture into the prepared baking pan and bake for 10 minutes.
- While the oat mixture bakes, add the caramels, cream, and the remaining ¼ teaspoon of salt into a large microwave-safe bowl. Stir them together and microwave for 1 minute. Stir then heat again for 1 additional minute and stir until the mixture is smooth.40 chewy caramel squares, ⅓ cup heavy cream, ½ teaspoon salt
- When the crust is finished baking, evenly sprinkle the chocolate chips over the top of it.1½ cup semi-sweet chocolate chips
- Then pour the caramel sauce over the chocolate chips.
- Next, sprinkle the caramel layer with the remaining crust mixture and use your hands to tap it down lightly.
- Bake for another 15 minutes or until lightly browned.
- Transfer the pan to a wire rack and then allow to cool completely before slicing.
Video
Notes
- The caramel will all run out if you try to slice the bars while hot. If you leave them at room temperature, you will probably have to allow them to set overnight. Or you may place the baking pan in the fridge for at least 3 hours.
- How To Store: Keep these Carmelitas stored in an airtight container at room temperature and eat them within a week. You could also freeze them for up to 4 months.
- Can I Use Instant Or Quick-Cooking Oats In This Recipe? The texture of these bars is much better if you stick to using rolled or old-fashioned oats.
- Is This A Recipe That Can Be Easily Doubled? It sure is! The only difference would be to cook them in a 9×13 inch pan if you decide to double the recipe.
- Can I Use Granulated Sugar Instead Of Light Brown Sugar? Yes, swapping out the brown sugar for white sugar should work just fine. I do however find that the brown sugar gives it more of a caramelly flavor.
- Could I Just Use Caramel Sauce From A Jar Instead Of Making It? Caramel sauce from a jar is generally too thin to use. If you were able to find a really thick pre-made sauce then you could certainly try it!
- What Kind Of Caramels Did You Use? I used Kraft caramels, the ones that are wrapped in clear plastic.
Nutrition
Did You Make This Recipe?
Don’t forget to share it with me on Instagram @sugarandsoulco and follow on Tiktok @sugarandsoulco and Pinterest @sugarandsoulco for more!
Share your thoughts!
Love this recipe? Share your thoughts with me and leave a review! And don’t forget to connect on your favorite social platform below!


Made this Gluten Free for my Garden Club & they LOVED them!! This will remain in my recipe file. Many thanks!
I made these for a large group following your recipe but using Gluten Free 1.1 flour. It was a HUGE success. Everyone LOVED them! Many thanks for this lovely recipe.
We made these today and they are so easy and fun! Definitely making this again!