
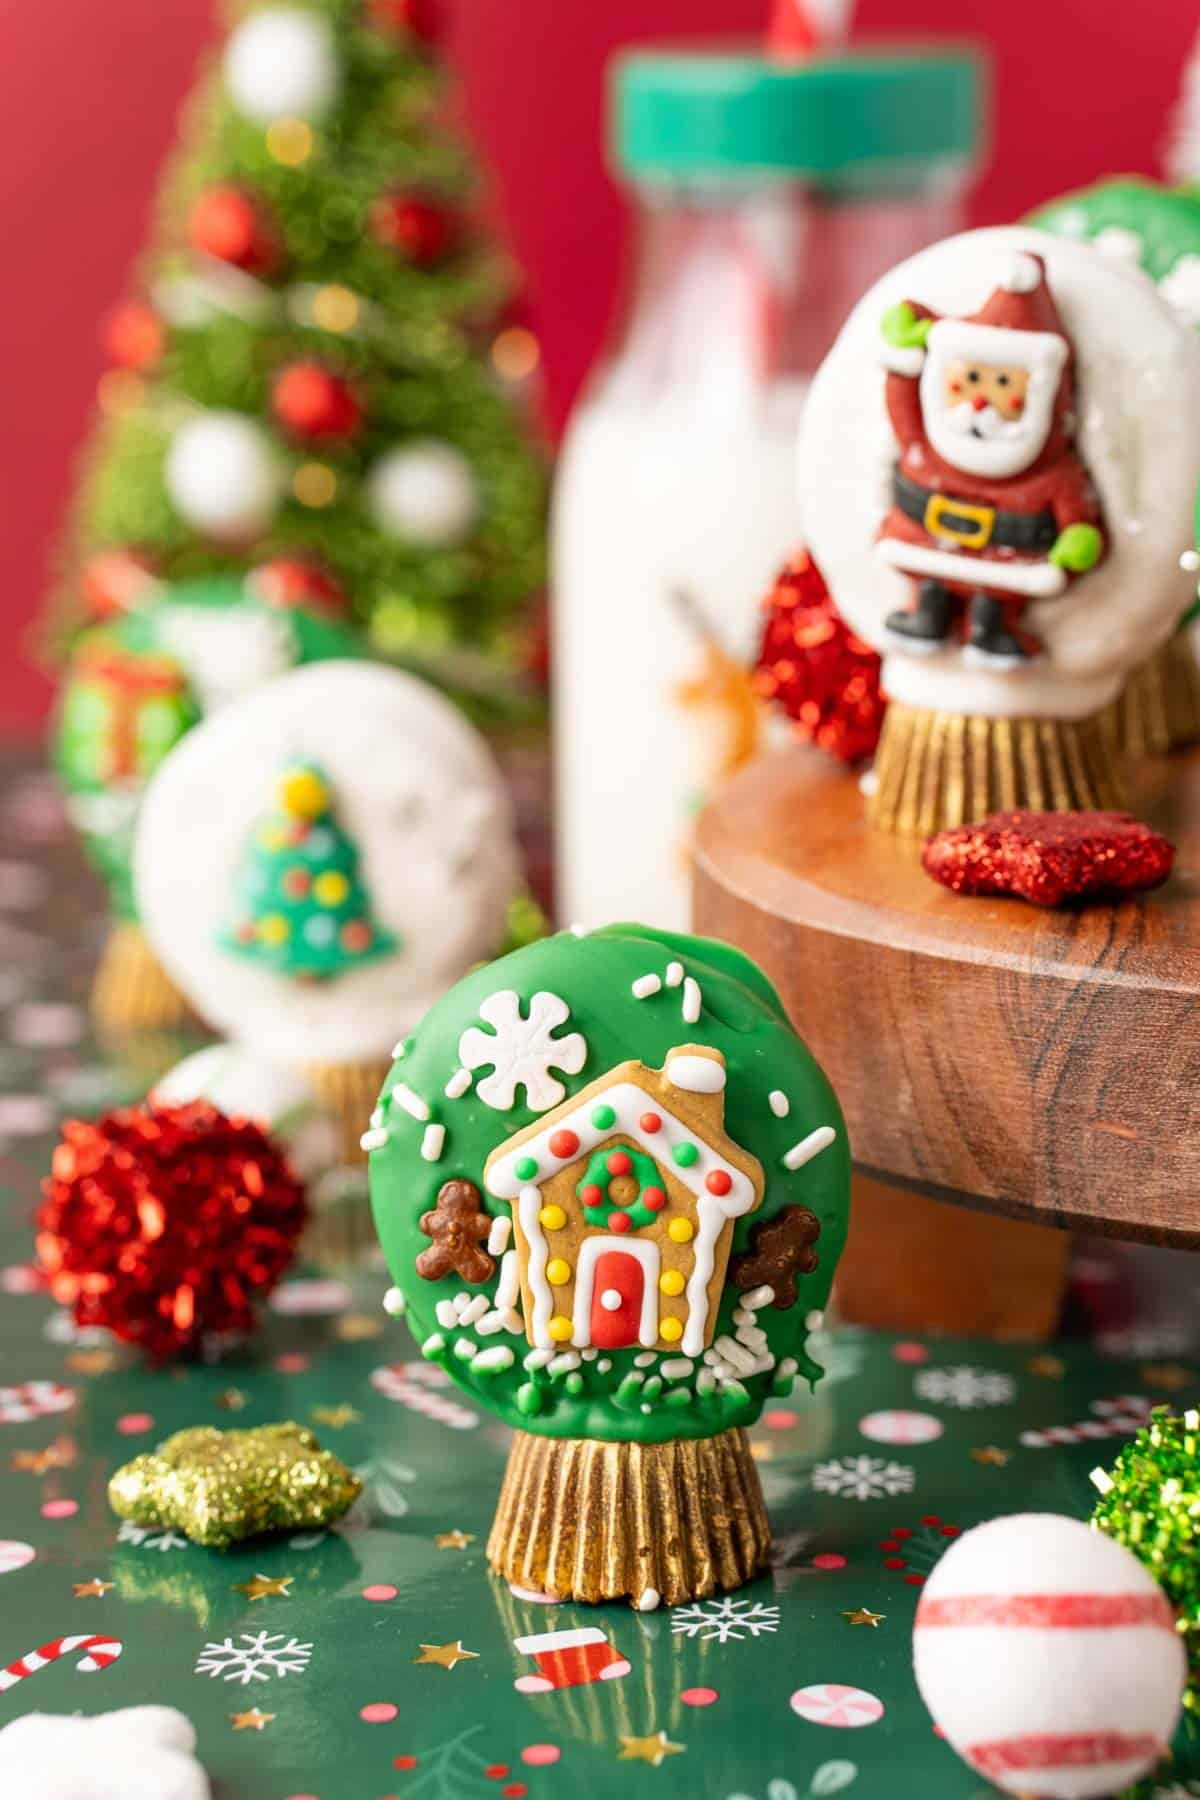
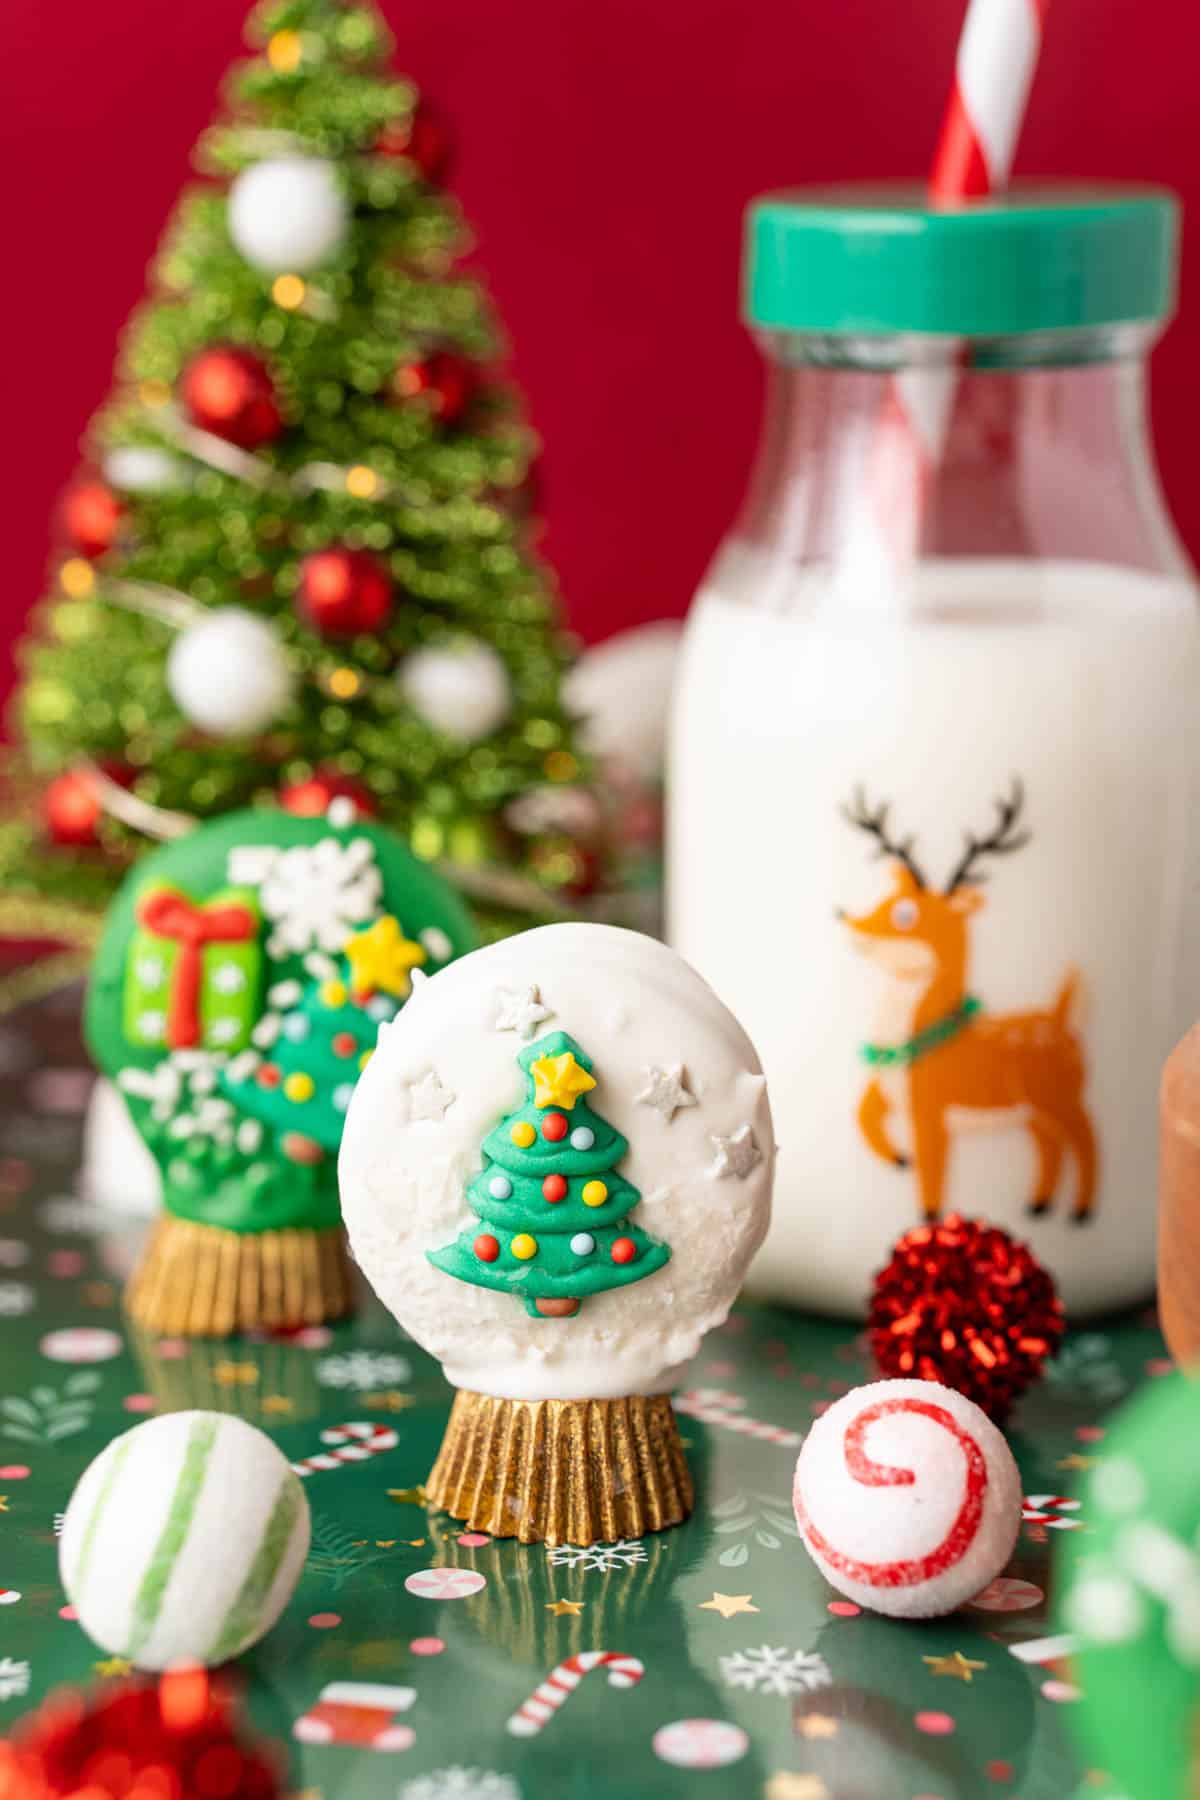
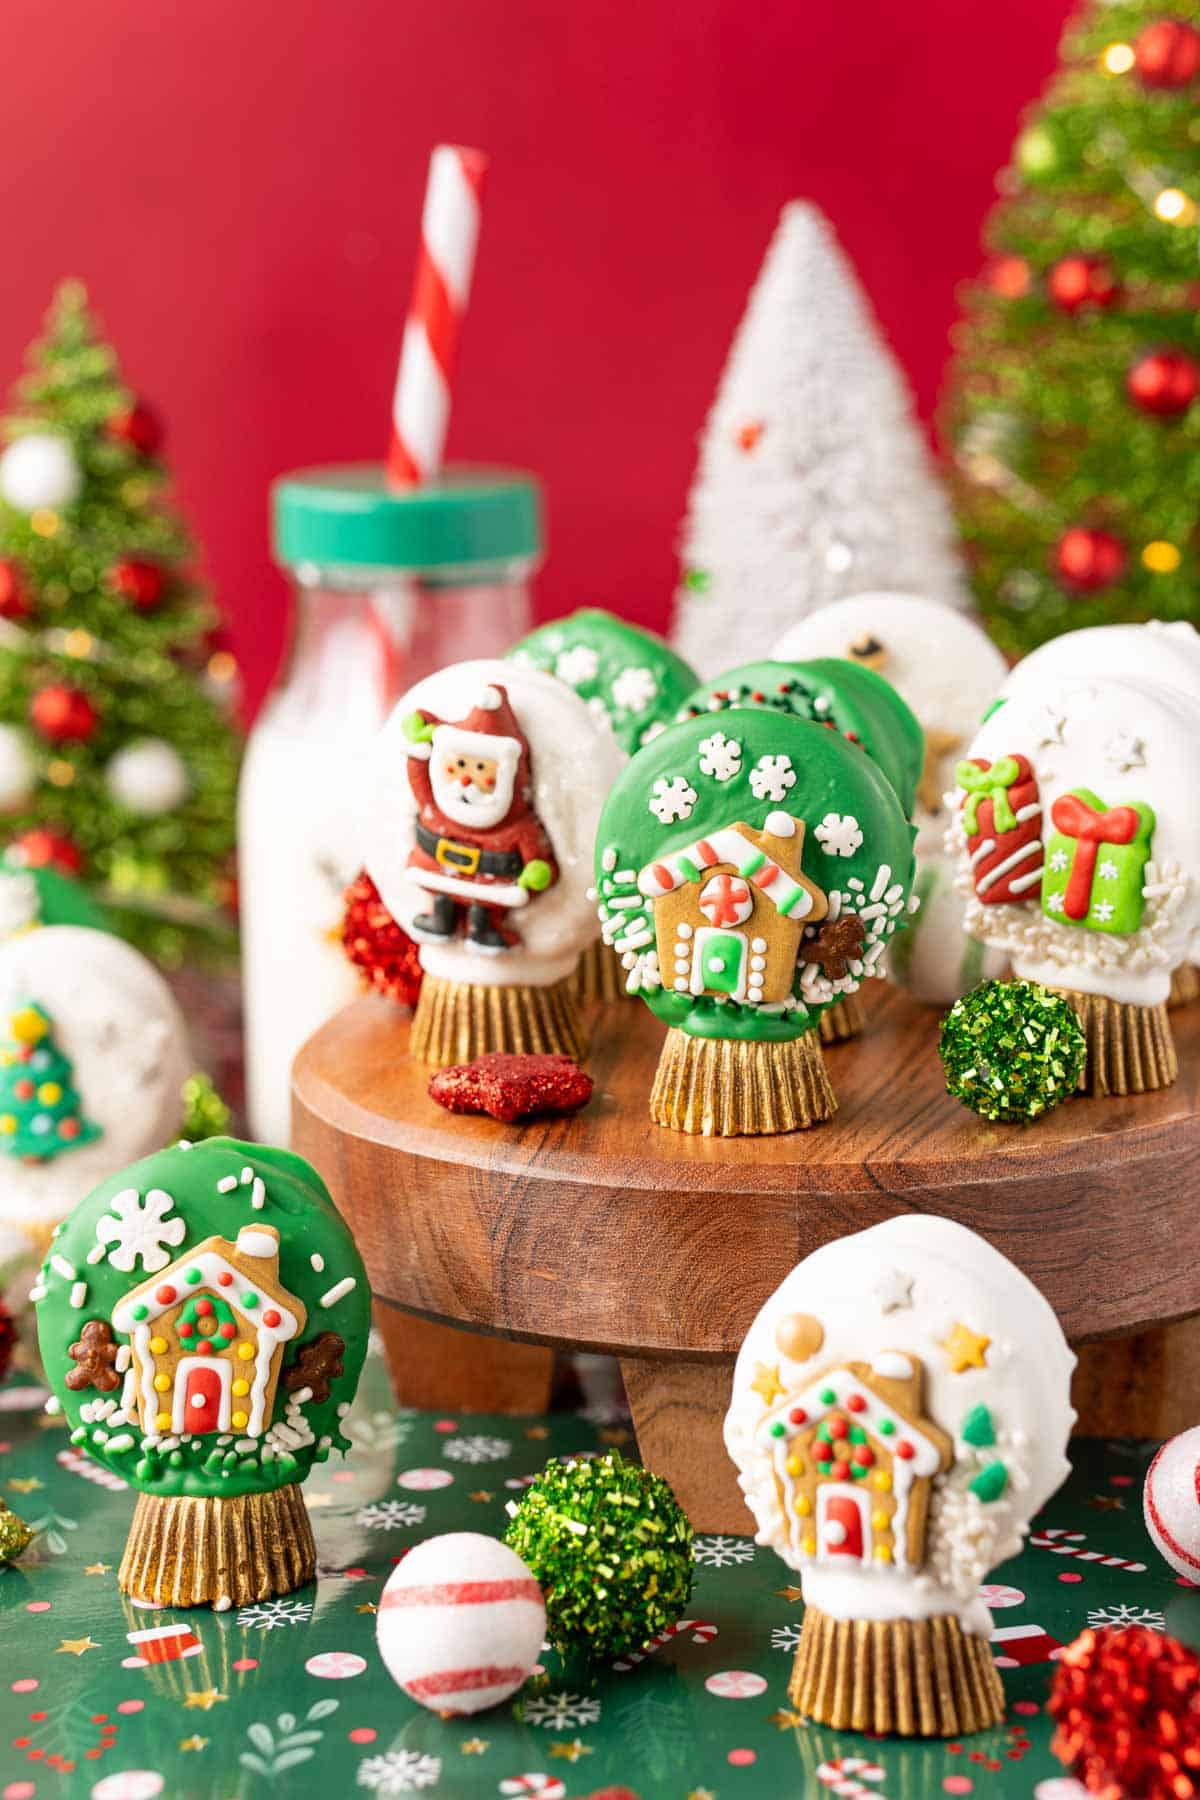
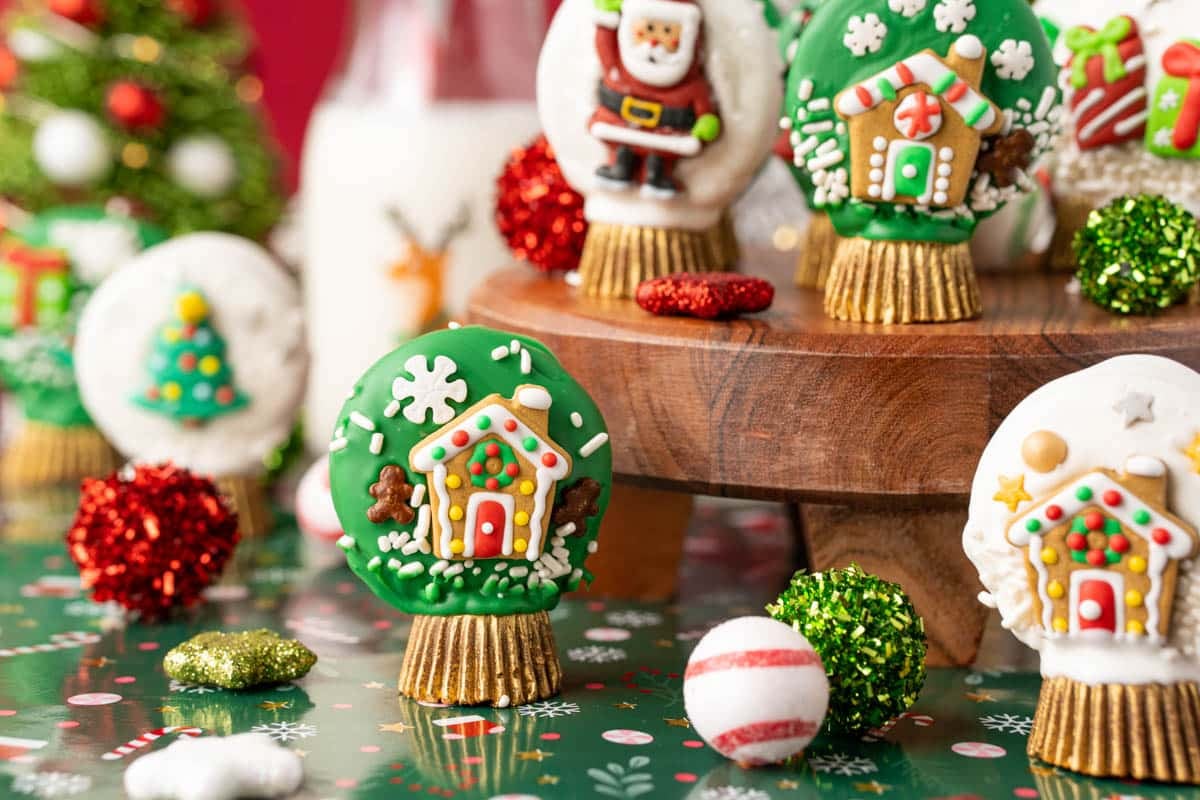
Christmas Oreo Snow Globe Cookies

Christmas Oreo Snow Globe Cookies are an edible cookie craft that involves no baking, just dipping and decorating with sprinkles and decorations! A fun family activity that takes just an hour to do!
These Easy Oreo Snowman Cookies and Cute Oreo Penguin Cookies are another fun edible Oreo craft! You could even do a few of each at the same time since they all use similar ingredients!
All About These Snow Globe Cookies
Snow Globe Cookies are a fun winter or Christmas cookie that will have all the kids excited to make! Set out a tray of sprinkles, icing, and 2D icing decorations, and watch their creativity come to life!
You’ll love the break this recipe gives your oven and kitchen! No baking and no messy pantry ingredients mean less cleanup on your end!
Rebecca’s Recipe Review
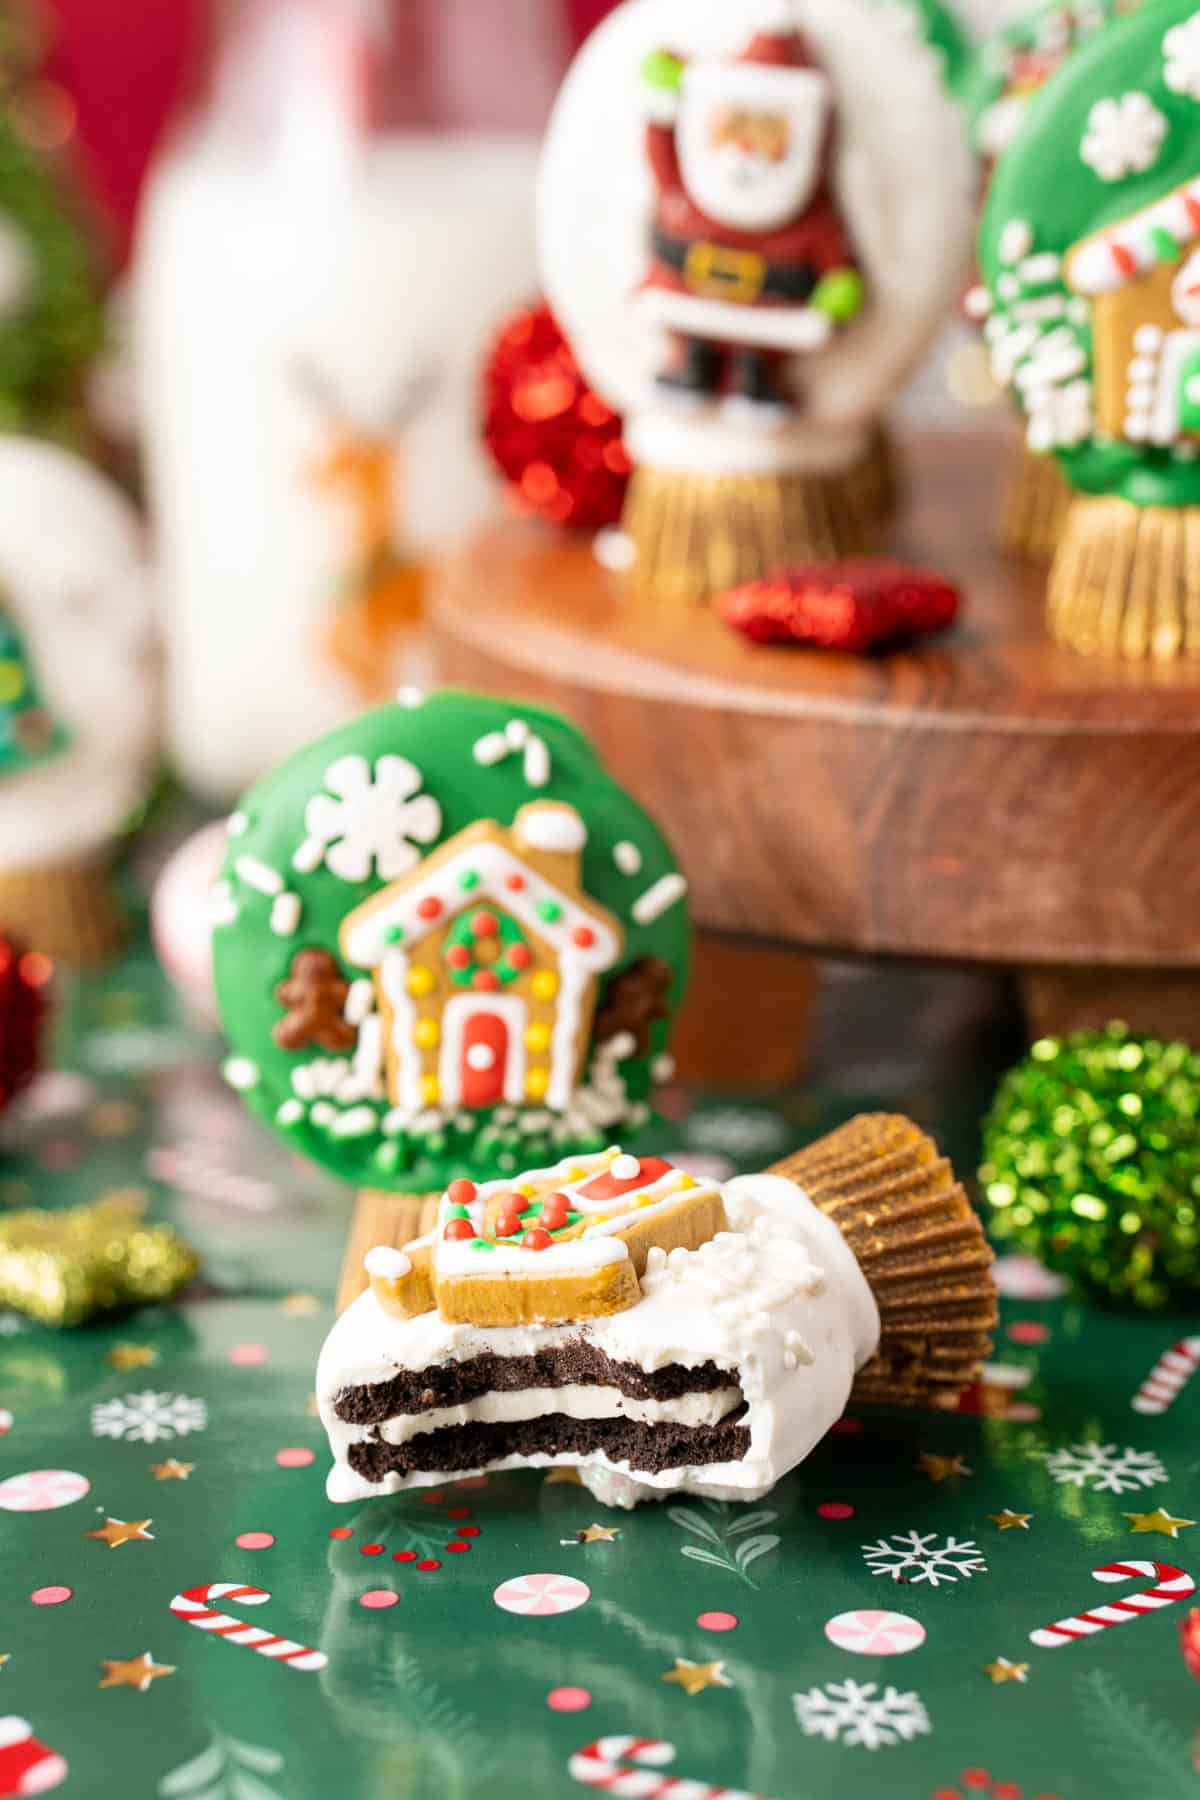
Taste: Chocolaty cookies with cream filling get a vanilla candy melt coating! Once the cookie globe is made, it gets attached to a salty-sweet peanut butter cup! Making for a sweet snow globe cookie that goes down well with an ice-cold glass of milk!
Texture: These crunchy cookies have a soft chocolate coating with crunchy decorations on top! Sending your mouth on a tasty texture adventure that stops at the soft, tender Reese’s Peanut Butter Cup base!
Ease: 3/10
Pros: Store-bought ingredients, no baking, no chilling, and lots of edible fun!
Cons: Working with melted chocolate can be messy, but sweet!
Would I Make This Again? Yes, my kids look forward to making these snow globes every year!
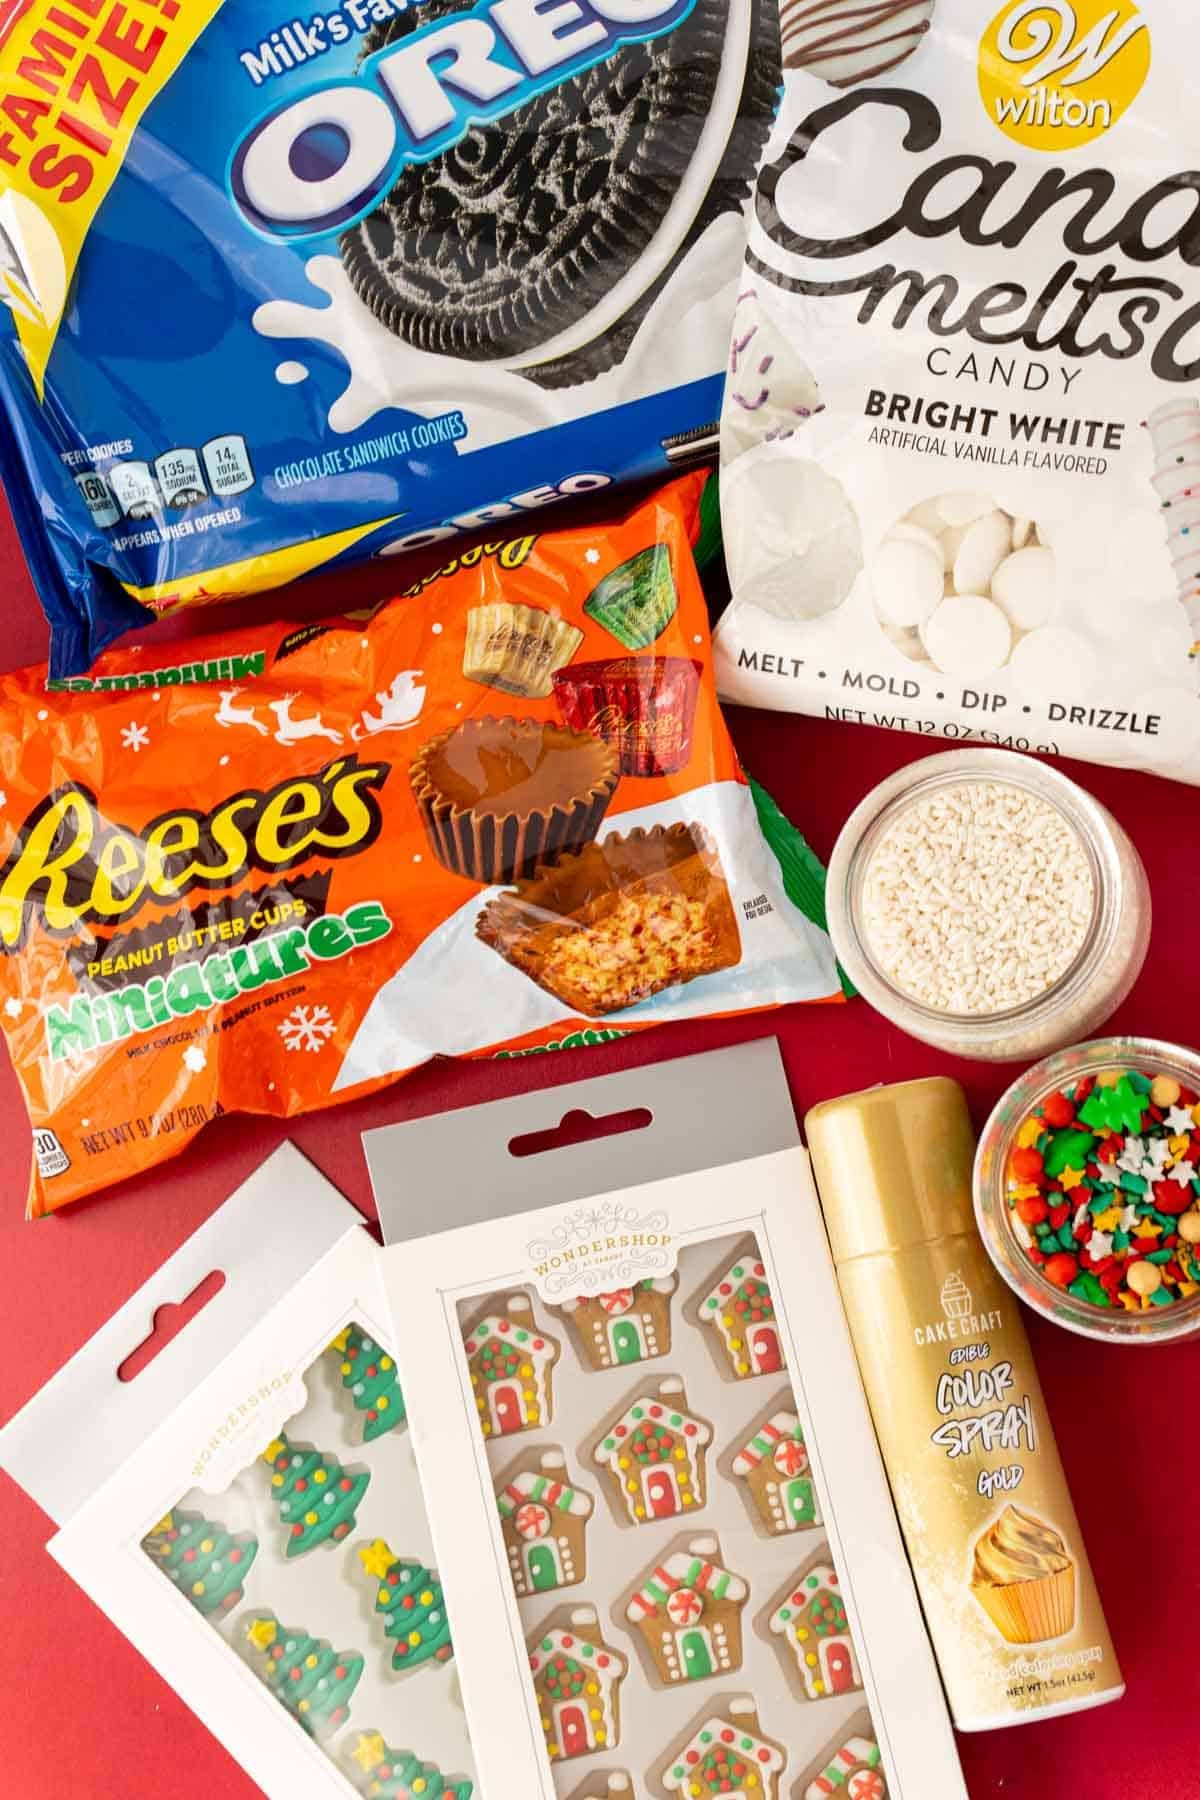
Ingredients For Christmas Oreo Snow Globes
- Reese’s Miniatures
- Gold or Silver Color Mist – This can be found in the baking aisle at Walmart or craft stores like Jo-Anns. I’ve also found it at Party City as well as on Amazon! I recommend using the Wilton brand color mist (affiliate link) for the best results.
- Candy Melts – I’ve found that two bags of candy melts get the dipping job done comfortably! Two bags cover a 14-ounce package of regular Oreos or a 15-ounce package of Double Stuf Oreos.
- Oreo Cookies
- 2D Icing Decorations
- Holiday Sprinkles
How To Make Christmas Oreo Snow Globe Cookies
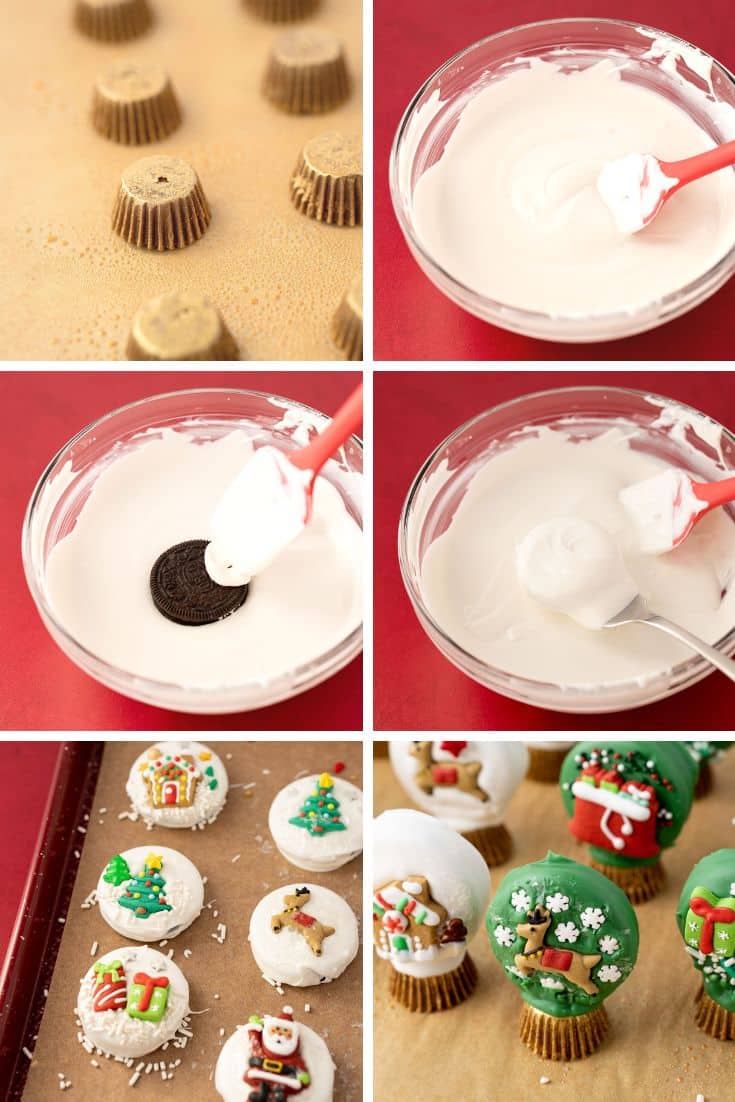
- Line baking sheets with parchment paper and set them aside. Then unwrap the Reese’s peanut butter cups and place them large side down on one of the prepared baking sheets.
- Spray the peanut butter cups with the color mist. Then allow them to dry.
- Heat the candy melts until smooth using a separate bowl for each color.
- Dip an Oreo into the melted chocolate, allowing the excess to drip off over the bowl.
- Transfer the dipped Oreo to a prepared baking sheet. Then add the 2D decorations and additional sprinkles.
- Repeat the dipping and decorating process until you’ve covered all of the Oreos.
- Dip the bottoms of the Oreos into the candy melts and then gently press them on top of the peanut butter cups. This turns them into a snow globe!
- Allow the Snow Globe Cookies to set completely before enjoying.
Rebecca’s Recipe Tips
- Give The Kids A Job – While you line the baking sheets with parchment paper and prepare the candy decorations, let the kids unwrap the peanut butter cups. They’ll love to help with a job that’s their own while you get started on other things to make for smooth cookie decorating. It’s a win-win!
- Melting – The candy melts can be melted in the microwave or by using a double boiler. Use whichever method you prefer! Just make sure the chocolate is nice and smooth with no lumps!
- Dipping – I found that using a fork for dipping worked best! When removing the Oreos from the melted candy melts, I slid the fork under them. Afterward, I tapped the fork gently off the side of the bowl to encourage any excess chocolate to drip off. Then I used a toothpick to slide the cookie off of the fork and onto the parchment paper.
- Decorating – When decorating, I’d recommend that you work in batches of three dipped cookies. That way, the candy doesn’t harden before the decorations can be added.
- Attaching – To attach the cookies to their snow globe base, dip the bottom of each Oreo back into the melted candy. Then gently press them on top of the peanut butter cups and hold them for 10 to 20 seconds. You may think the cookies feel too heavy and will just fall over, but they won’t! It just takes some time to hold each cookie onto the base to adhere securely! Alternatively, you can stick the peanut butter cups on while the Oreos are lying down and setting, but the cups will be at a bit of an angle and not quite as secure; if you’re just making them with the kiddos, this might be the easiest option.
Snow Globe Cookies – Tasty Variations & Substitutions!
- Oreo Flavor – Make these snow globe keepsake cookies using your favorite flavor of Oreo! Peanut butter creme, hazelnut, and peppermint would all make for tasty snow globes. You could even just the seasonal flavors like Snickerdoodle and Gingerbread!
- Decorating – Instead of using 2D icing decorations, you can draw on decorations by hand! Simply use melted candy melts and piping bags to draw and decorate the snow globes. Cookie icing could also be used!
- Ornaments – These same ingredients can also be used to make Oreo Ornament Cookies! Just place unwrapped Reese’s minis at the top of the dipped Oreo to create an ornament appearance. Then decorate the ornament using 2D decorations (affiliate link), cookie icing, or piping with melted candy melts.
- Skip Some Mess – You could get out of even more mess by buying and using White Fudge Covered Oreos. Then all you have to do is attach the snow globe base and decorate!
- Chocolate – White chocolate chips can be used in place of candy melts. When using chocolate chips, I like to add vegetable oil to them to create a smoother dipping consistency. I’d also recommend adding gel food coloring to the white chocolate chips to create red or green dipping colors.
Storage Instructions
Keep these Christmas cookies stored in an airtight container at room temperature. They can then be enjoyed for up to 2 weeks.
More Edible Christmas Fun:
- Cute Mini Yule Logs (Swiss Roll Cakes) – No baking, no messy ingredients, just edible fun!
- Reindeer Christmas Bark – Kids love making this fun holiday treat!
- Soft Christmas Sugar Cookies Recipe – It’s not Christmas without decorating sugar cookies!
- Meringue Christmas Trees (Cookies & Pops) – Festive treats that spread holiday cheer!
- Stained Glass Cookies – Colorful cookies made with melted Jolly Rancher candies in the center!
Did You Make This Recipe?
If you’ve tried this recipe, please let leave a review in the comments below. I love hearing from you! Don’t forget to tag me – @sugarandsoulco – on Instagram and Pinterest with your photos, or join our Sugar & Soul Show-offs Community and share them there.

Christmas Oreo Snow Globe Cookies
Equipment
- 1 Microwave-safe bowls per color
- 1 rubber spatulas per color
- 1 forks per color
- 1 Toothpicks per color
- 3 Baking sheets
- Parchment paper
Ingredients
- 36 Reese's Miniatures
- 1 can Gold or Silver Color Mist optional, Wilton brand works best
- 24 ounces candy melts
- 36 Oreo Cookies 1 (14oz.) regular Oreo package
- 36+ 2D Icing Decorations
- Holiday Sprinkles
Instructions
- Line three baking sheets with parchment paper and set aside.
- Unwrap the Reese's peanut butter cups and place them large side down on one of the baking sheets.36 Reese's Miniatures
- Use the color mist to spray the peanut butter cups all over following the directions on the can. Let dry while you make the Oreos.1 can Gold or Silver Color Mist
- Add the color melts to a microwave-safe bowl and melt for 1 minute, stir then melt at 30-seconds intervals, stirring between each one until smooth. Use separate bowls for each color and work with one color at a time for the best results.24 ounces candy melts
- Add an oreo to the melted candy and use a rubber spatula to scoop the candy over the top of it.36 Oreo Cookies
- Use a fork to scoop under the Oreo and lift it out, tapping until all the excess candy falls off, then sliding the bottom of the fork against the bowl.
- Use a toothpick to help slide the Oreo off the fork onto the prepared baking sheets.
- Then add the 2D icing decorations and additional sprinkles to decorate the candy-coated Oreos. Work in batches of three to that the candy doesn't harden before the decorations can be added.36+ 2D Icing Decorations, Holiday Sprinkles
- Let the Oreos set completely, about 10 to 15 minutes after being dipped.
- Reheat the candy melts if needed for 15 to 30 seconds until smooth again.
- Dip the bottoms of the Oreos about ¼-inch into the candy melts and then gently press them on top of the peanut butter cups, holding each one for 10 to 20 seconds to ensure it stays. Some of them may feel heavy and like they want to fall over, but they will stay if you just hold them a bit as the candy melts start to do their thing pretty quickly. You can stick the peanut butter cups on while the Oreos are lying down and setting, but the cups will be at a bit of an angle and not quite as secure; if you're just making them with the kiddos, this might be the easiest option.
- Let set completely before enjoying, about 15 minutes.
Notes
- 2 (12oz.) bags of candy melts should cover a 14-ounce package of regular Oreos or a 15-ounce package of Double Stuf Oreos.
- Technically a 12-ounce bag can cover 24 but we want to account for the extra needed to adhere the Oreos to the peanut butter cups and for ease of dipping and coating.
- It took me about 1 hour to make a full package of Oreos since they first Oreo you do will be ready to go on the peanut butter cups when you finish with the last ones so there really isn’t any downtime because you are working in batches the whole way through.
- The 2D icing decorations are just an easy way to decorate these, but you could use additional candy melts and piping bags to draw and decorate your snow globes.
- You can use Reese’s Mini (unwrapped) to make ornaments instead of snow globes.
- Wilton brand color mist works best. For these photos, I used the Walmart brand, but it was wetter and didn’t give as nice and even of a coating as when we made these with the kiddos a week later.
Nutrition
Did You Make This Recipe?
Don’t forget to share it with me on Instagram @sugarandsoulco and follow on Tiktok @sugarandsoulco and Pinterest @sugarandsoulco for more!


Share your thoughts!
Love this recipe? Share your thoughts with me and leave a review! And don’t forget to connect on your favorite social platform below!