
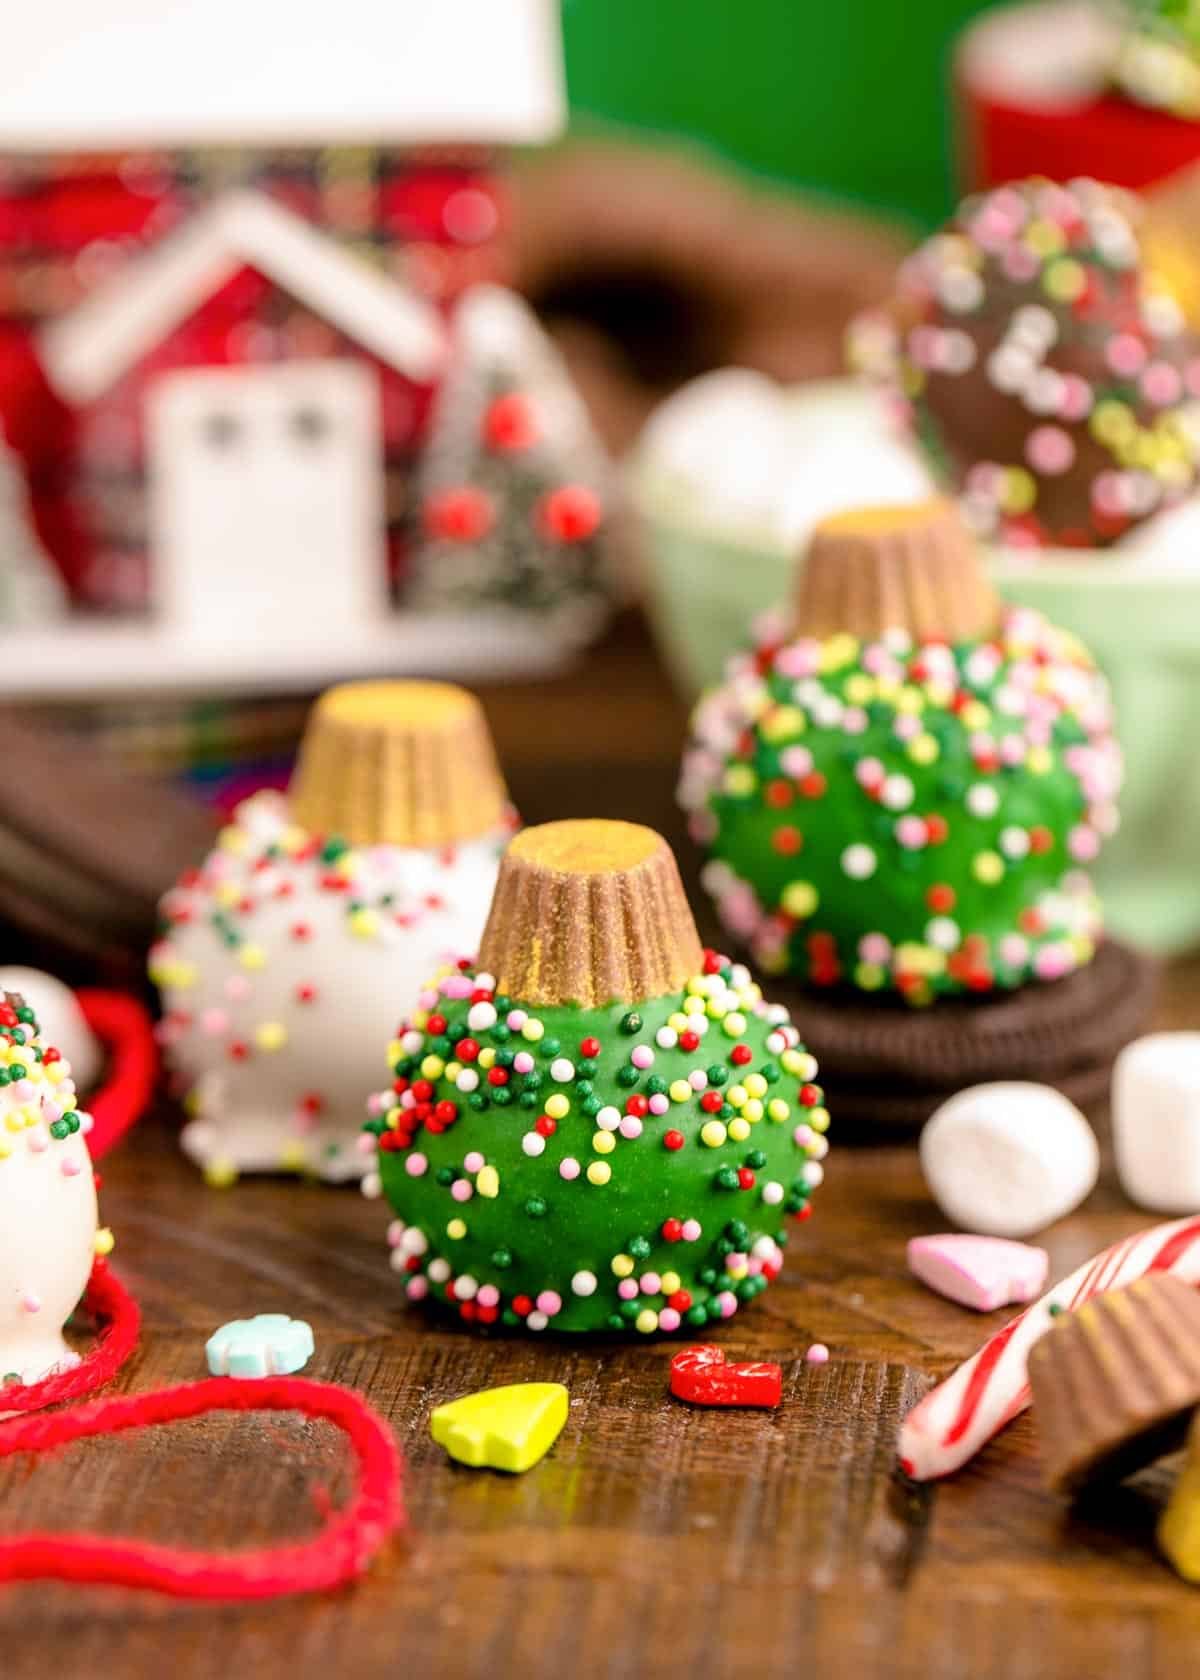
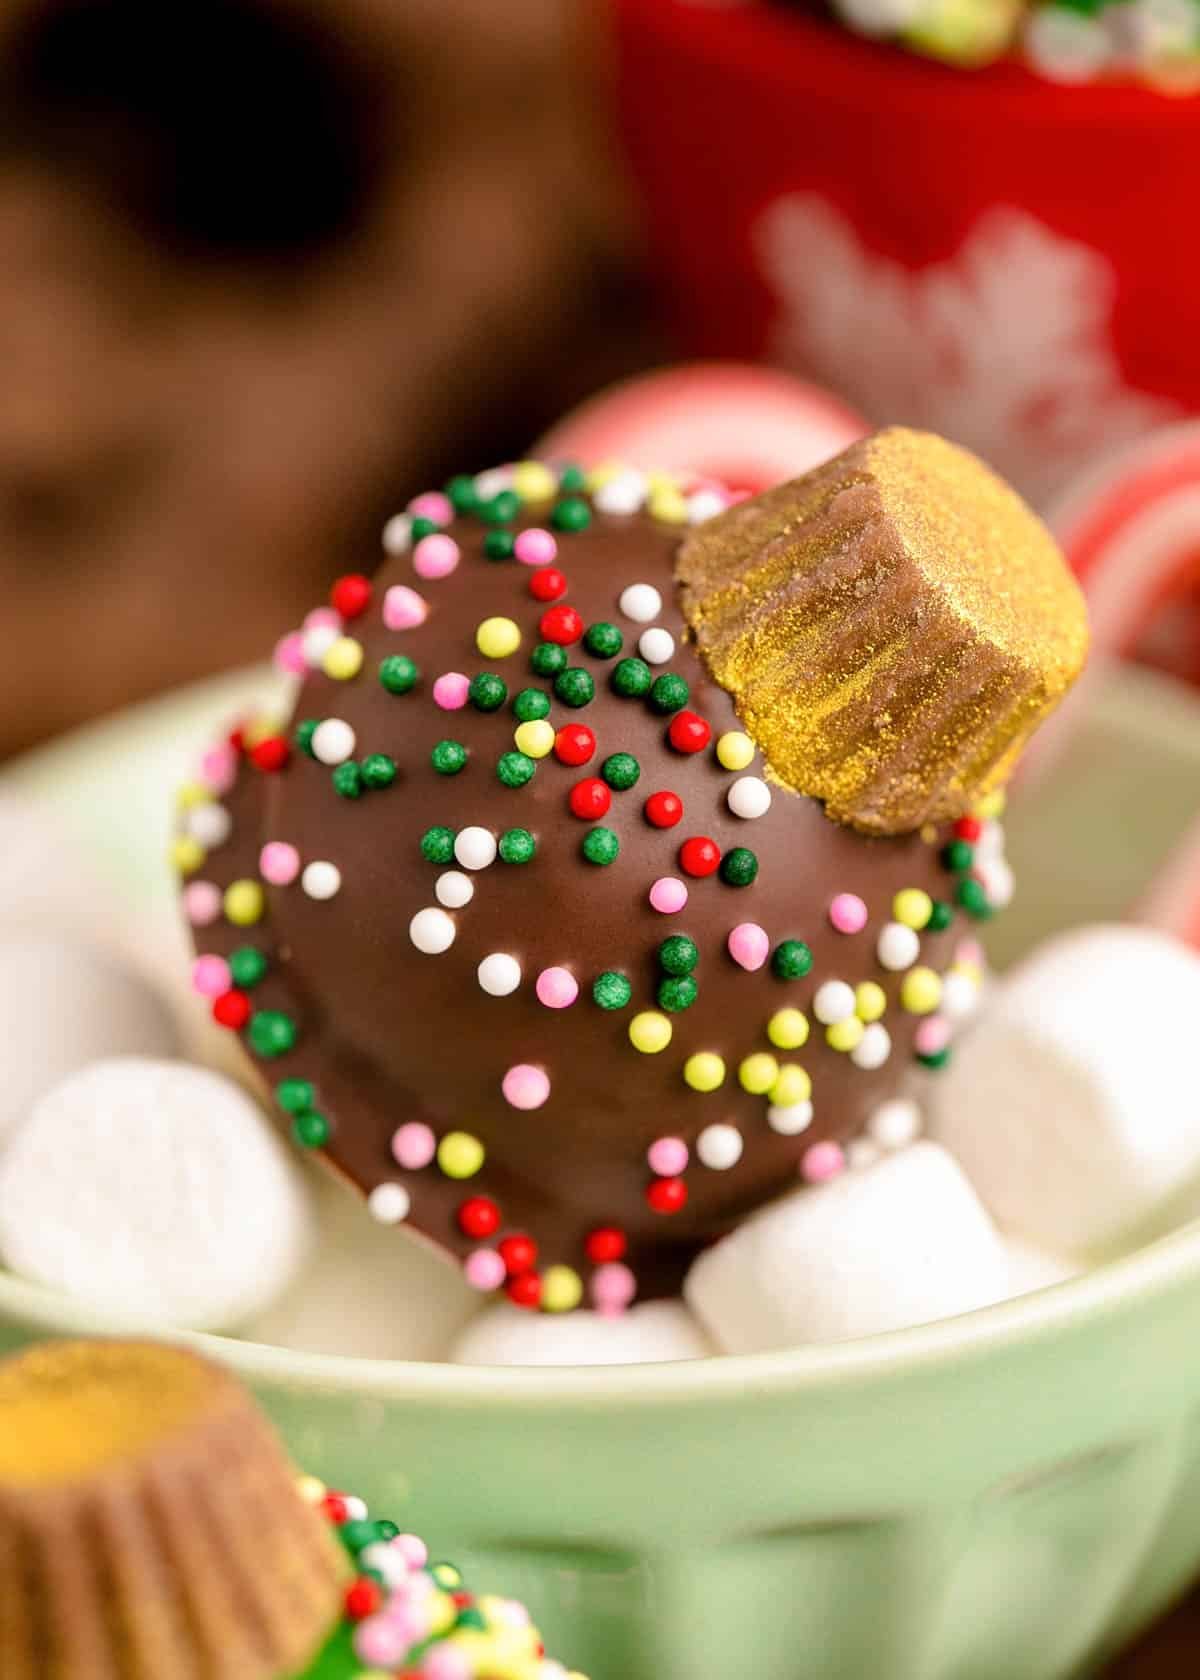
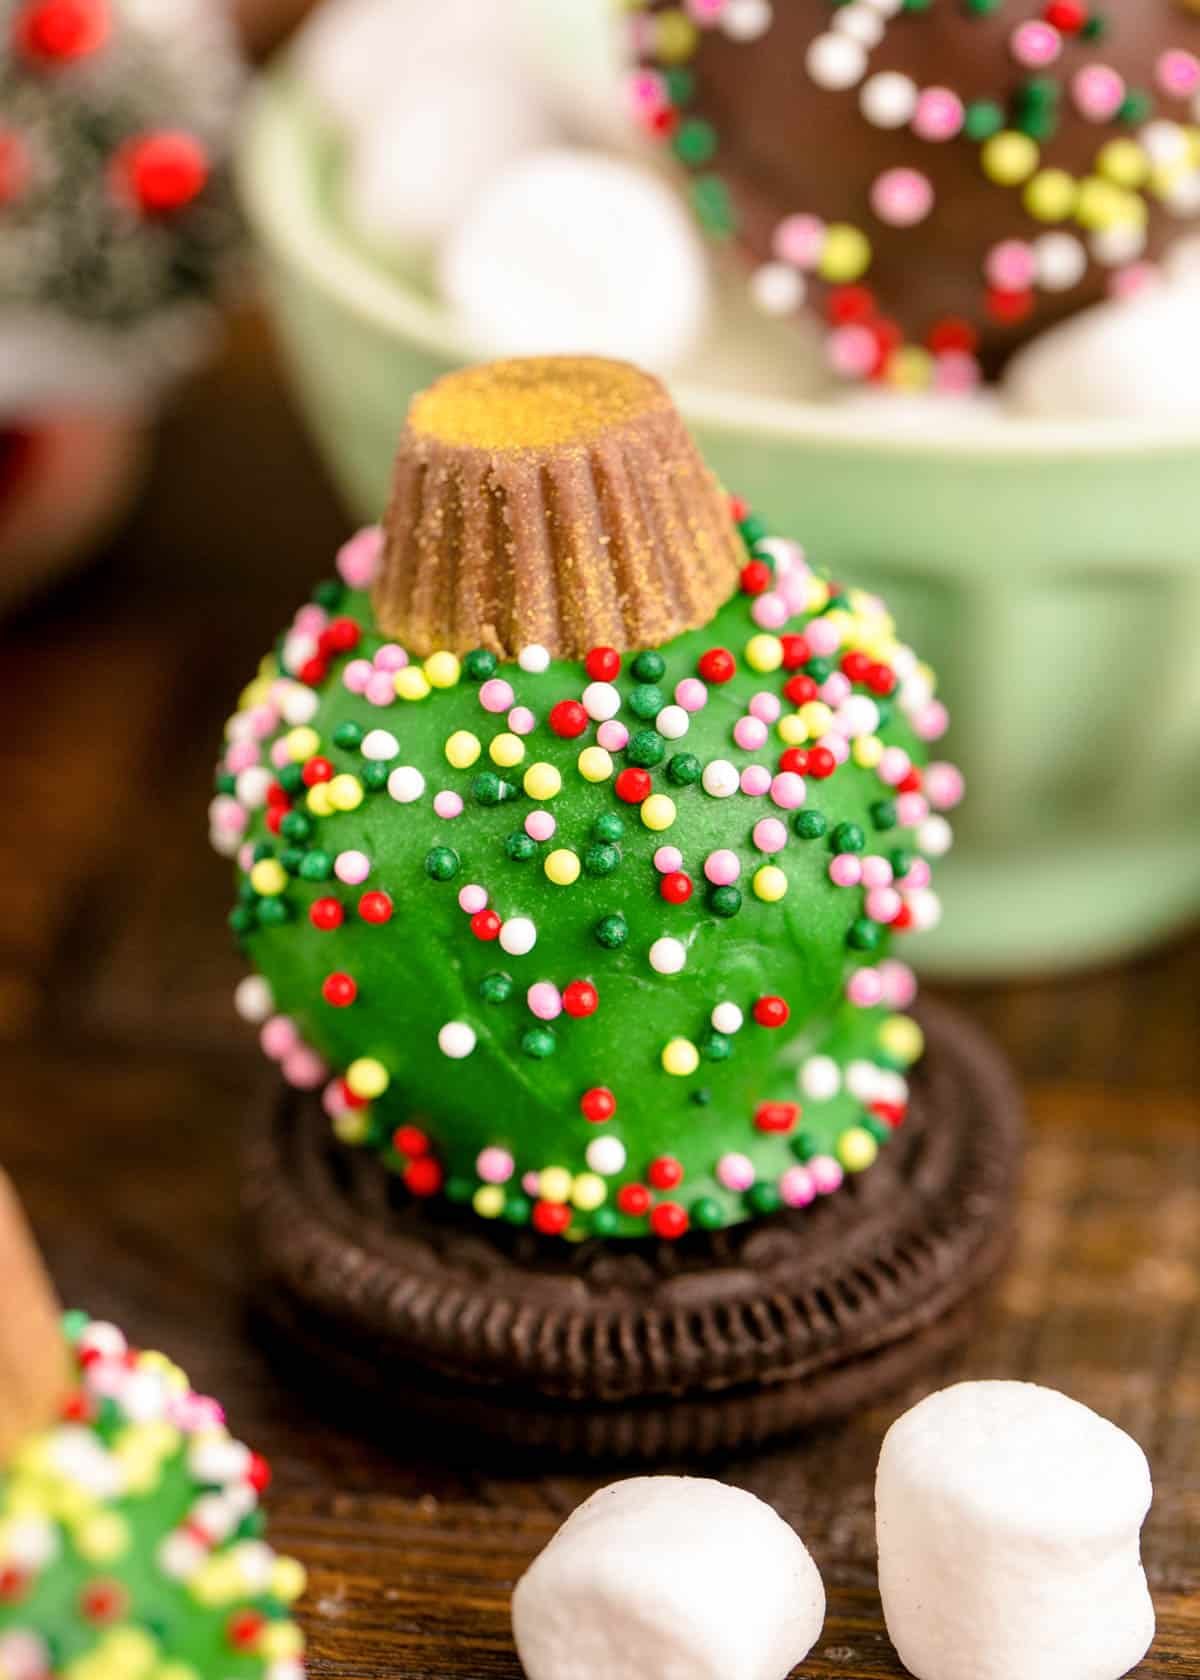
Easy Oreo Ball Ornaments
Oreo Ball Ornaments are fun, festive, no-bake treats that are made with only 4 ingredients and finished off with edible color spray and sprinkles! This is an exciting recipe that the whole family can make together!
Eat up another seasonally fun treat like these Grinch Cake Balls or Christmas Chex Mix! Both are filled with holiday colors to bring the magic!
All About These Oreo Ball Ornaments
Deck the halls with these deliciously festive Oreo Ball Ornaments! This easy-to-make recipe is filled with America’s favorite cookie, cream cheese, melted chocolate, Reese’s Mini Cups, and festive sprinkles!
This holiday recipe brings easy Christmas fun with its minimalistic ingredients! Giving you the gift of fun memory-making without a big mess to clean up afterward!
Fun Ways To Enjoy These Oreo Ball Ornaments
- Decorating Party – This is a great recipe to have a decorating party with your family! Or your kids and their friends. Arrange a tray of sprinkles, 2D icing decorations, and cookie icing, and then let everyone make their edible ornament!
- Gifting – Make a batch and then pop a few into cello bags. Then use colored twine or holiday ribbon to tie them. Once they’re all dressed up, you can gift them away to neighbors, co-workers, and even your kids’ teachers.
- Parties and Potlucks – Since this recipe delivers almost two dozen Oreo Ball Ornaments, it’s plenty to bring to parties and potlucks. They’ll disappear in no time!
Rebecca’s Recipe Review
Taste: The chocolaty, cream-filled Oreos get crushed up and combined with cream cheese, making for a tangy, sweet filling that’s wrapped in a chocolate hug! The Reese’s Mini cups bring in a bite of peanut buttery flavor with a slightly salty kick! As a whole, these Oreo Balls will be hard to resist!
Texture: These handheld treats have a creamy filling that’s coated in smooth hardened chocolate. With a sprinkle finish and Reese’s Cup topping, you’ll also enjoy a little crunchy texture to pair with the soft ones!
Ease: 4/10
Pros: A delicious treat wrapped up in a fun activity!
Cons: Working with melted chocolate can be messy.
Would I Make This Again? Yes!
Ingredients For Easy Oreo Ball Ornaments
- Oreos
- Cream CHeese
- Reese’s Mini Unwrapped Cups
- Gold Color Mist
- White Almond Bark
- Chocolate Almond Bark
- Green Candy Melts
- Christmas Sprinkles
How To Make Easy Oreo Ball Ornaments
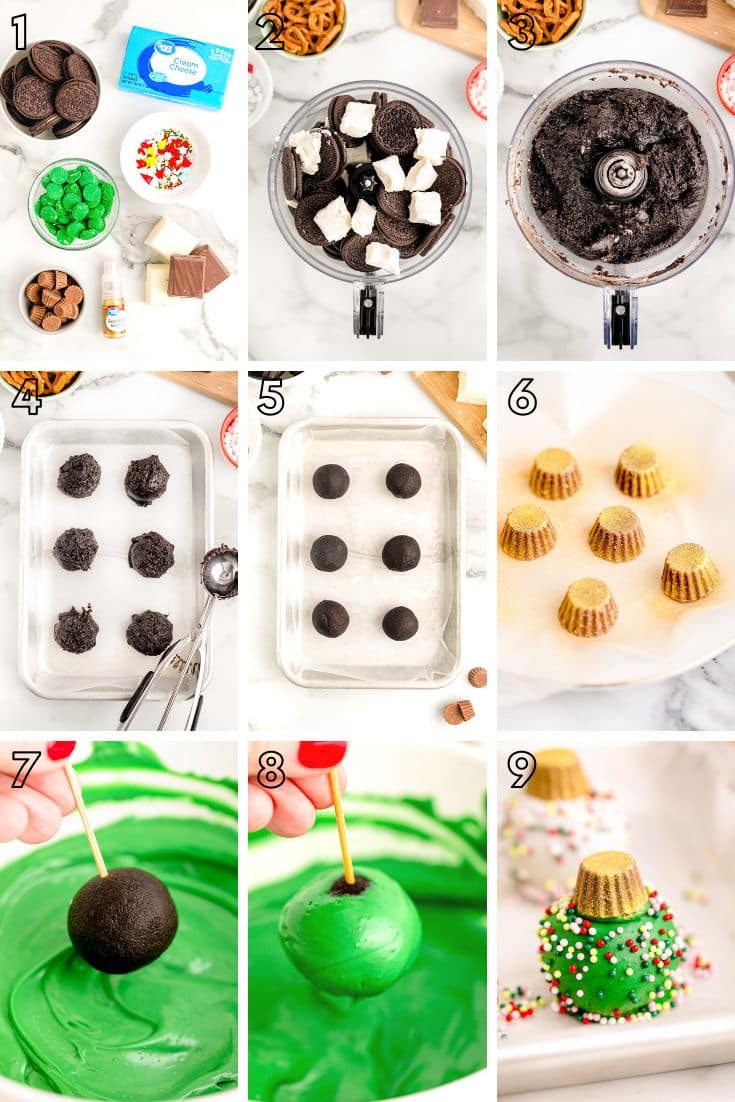
- Line baking sheets with wax paper and set them aside.
- Pulse Oreos and softened cream cheese in a food processor until smooth.
- Portion out the Oreo filling mixture with a cookie scoop and then roll each scoop into a ball. Transfer them onto the prepared baking sheet and place them in the freezer to chill.
- Place the Reese’s mini cups on the wax paper, wide end down. Then spray them with the gold color mist.
- Melt the almond bark and candy melts in separate bowls until smooth.
- Dip the chilled Oreo balls into the various melted chocolates. Then top them with a gold peanut butter cup and decorate with sprinkles quickly.
- Transfer them into the fridge to allow them to firm up.
Rebecca’s Tips
- Filling – A food processor works great to make the creamy filling for these truffles! I prefer to layer the cookies with half of the softened cubed cream cheese on top of them. Then layer more cookies on top and finish off with the remaining cream cheese. This helps incorporate the ingredients evenly. The filling is thick, so plan to stop the food processor a few times to scrape the sides down.
- Food Processor – Don’t have a food processor? No problem! Instead of using a food processor to crumble the Oreos, you can try using a blender that has a pulsing option. You could also do this by hand by placing the Oreos into a gallon Ziploc bag. Once they’re in the bag, squeeze the excess air out of it and seal it. Then using a rolling pin to roll over the cookies to form fine crumbs. When the cookie crumbs are ready, you can add them to a bowl with the softened cream cheese. Then an electric mixer can be used to incorporate the two together.
- Portioning – Using a 1-inch cookie scoop to portion out the filling makes for consistently sized truffles! Roll each scooped portion using your hands to create a smooth ball.
- Chill – Once all the Oreo balls have been made, slide the baking sheet into the freezer. This helps them firm up to make for easier dipping! Just be careful not to leave them in there for too long! If the temperature of the frozen Oreo balls and warm melted chocolate is too great, you’ll be left with a cracked chocolate coating.
- Spraying – Spray the unwrapped Reese’s Mini cups with edible spray paint before beginning the recipe. This way, they have time to dry before you work with them!
- Batches – It’s best to work in small batches of about 3 Oreo Balls. That way, you can dip them, place Reese’s mini on top, and decorate them all before the chocolate coating hardens! This small batch method is also great when you’re learning how to decorate Oreo Truffles. Gives you plenty of time to allow your creative juices to flow when decorating with all the sprinkles without worrying about the chocolate hardening.
How To Store Oreo Ball Ornaments
Store the Oreo balls in a flat layer in an airtight container. Then store them in the fridge to enjoy for up to 2 weeks.
If needed, you can store them in layers with parchment paper separating them. This way, the truffles don’t stick together and potentially mess up the decorations.
Substitutions & Variations
- Cream Cheese – I haven’t tried or tested this recipe with anything other than full-fat cream cheese. However, if you prefer you can swap out full-fat for reduced-fat cream cheese, and it should work just fine. Though you may notice a flavor difference since full fat provides the richest flavor!
- Colored Almond Bark – If it’s easier, you can just dye the white almond bark with food coloring instead of buying colored candy melts. To do so, I’d recommend using gel food coloring. This way, the color turns out vibrant without adding too much food coloring. Oftentimes, you need many drops of food coloring to achieve a color. When too many drops are added to melted chocolate, you run the risk of seizing up the chocolate. Making it so you can’t dip your Oreo Balls!
- Melted Chocolate – I really prefer to use either candy melts or almond bark to give the Oreo Balls the best smooth chocolate coating. However, chocolate chips will work. I would just suggest that you add in coconut oil or vegetable oil to make for a smooth finish.
Freeze To Decorate Later!
Get ahead of holiday baking or that decorating party by making a batch of Oreo Balls to freeze and finish later!
I would suggest flash-freezing them on a baking sheet. Then transfer the frozen Oreo balls to an airtight container or Ziploc bag with the excess air squeezed out of it.
Then store the Oreo balls in the freezer for up to 2 months. When you’re ready to decorate them, just transfer them from the freezer into the fridge the night before to allow them to thaw overnight.

More Festive Christmas Recipes:
- Easy Reindeer Cakes – Made with store-bought premade snack cakes!
- Christmas Ice Cubes – Yes, even your punch bowl deserves to be dressed up!
- Chocolate Covered Grahams – Decorated with your favorite Christmas sprinkles!
- Grinch Cake Balls – Enjoy with your favorite version of The Grinch movie!
- Easy Christmas Wreath Cookies – A fun edible activity to do with the kids!
Did You Make This Recipe?
If you’ve tried this recipe, please let leave a review in the comments below. I love hearing from you! Don’t forget to tag me – @sugarandsoulco – on Instagram and Pinterest with your photos, or join our Sugar & Soul Show-offs Community and share them there.

Christmas Ornament Oreo Balls
Ingredients
- 1 (14.3oz.) package Oreos about 35 Oreos
- 8 ounces cream cheese softened and cut into cubes
- 20 Reese’s mini unwrapped cups
- gold color mist
- 6 ounces white almond bark or white chocolate melting wafers
- 6 ounces chocolate almond bark or chocolate melting wafers
- 12 ounces green candy melts you can also use red if you prefer
- Christmas Sprinkles
Instructions
- Line a baking sheet with wax paper and set aside.
- Add the Oreos and softened cream cheese cubes to a food processor and pulse on high until smooth. This may take a while because the ingredients are thick. Be sure to stop the processing every so often to scrape down the sides if needed.1 (14.3oz.) package Oreos, 8 ounces cream cheese
- Portion out the Oreo mixture with a small or medium cookie scoop. Roll each scoop into a smooth ball and place them on the prepared baking sheet. Transfer the baking sheet to the freezer for 15 minutes to firm up.
- Arrange the Reese's mini cups on wax paper, wide end down, and spray them with the color mist. Let the mist set.20 Reese’s mini unwrapped cups, gold color mist
- When 5 minutes remain of the chill time, heat the almond bark and candy melts in separate microwave-safe bowls, one at a time. Each fo 1 minute to start, then stir and microwave at additional 30-second intervals, stirring between each one until smooth.6 ounces white almond bark, 6 ounces chocolate almond bark, 12 ounces green candy melts
- Remove the Oreo Balls from the freezer and dip them one at a time into the various melted chocolates, coating them completely, and set them back on the baking tray. I like to work in batches of 3, then immediately top the balls with a gold peanut butter cup and decorate with sprinkles quickly before the chocolate hardens.Christmas Sprinkles
- Place back in the refrigerator for at least 30 minutes to allow the Oreo balls to completely set up.
Notes
Nutrition
Did You Make This Recipe?
Don’t forget to share it with me on Instagram @sugarandsoulco and follow on Tiktok @sugarandsoulco and Pinterest @sugarandsoulco for more!


Share your thoughts!
Love this recipe? Share your thoughts with me and leave a review! And don’t forget to connect on your favorite social platform below!