
Halloween Spider Cookies



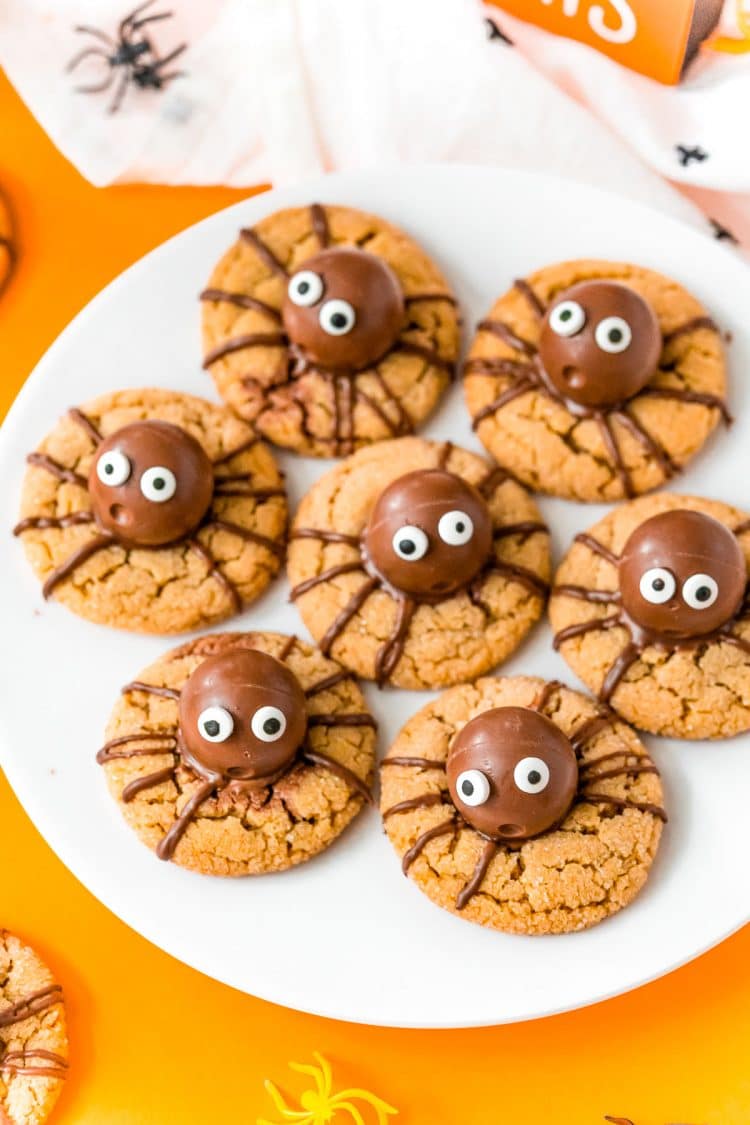
Halloween Spider Cookies are a spooky twist on classic Peanut Butter Blossoms! Made with truffles nestled in soft, chewy peanut butter cookies and decorated with chocolate and candy eyes.

Easy Halloween Cookies
It’s hard to believe Halloween is only a few weeks away, but there’s still plenty of time to get in the spirit and bake up some delicious Peanut Butter Spider Cookies!
These Easy Halloween Cookies are super easy to make, even the kiddos can help! This fun Halloween dessert is a cute idea to make with the kids and serve them at Halloween parties alongside Halloween Cupcakes and Halloween Punch!
Rebecca’s Recipe Review
Taste: Peanut butter and chocolate.
Texture: Chewy cookies topped with a chocolate candy!
Ease: 5/10
Pros: Festive cookies that are made with pantry staple ingredients and candy!
Cons: None.
Would I Make This Again? Yes, these are a great Halloween cookie for parties!
Ingredients For Spider Cookies
Light Brown Sugar
Peanut Butter
Vegetable Shortening
Whole Milk
Vanilla Extract
Large Egg
All-Purpose Flour
Baking Soda
Kosher Salt
Granulated Sugar
Chocolate Melting Wafers
Lindt Truffles
Candy Eyes
Spider Cookie Variations
If peanut butter isn’t really your thing or it’s an allergy concern or maybe it IS your thing and you want to amp up the flavor a bit. Here are some other ideas for making these cookies.
Double Chocolate – Use my Double Chocolate Chip Cookies recipe (just omit the chocolate chips) and follow the same decorating method.
Sugar Cookies – Use your favorite chewy sugar cookie recipe.
Extra Peanut Butter – Instead of using Lindt truffles, try using upside-down Reese’s Miniature Peanut Butter Cups.
Super Easy Version – If you are really short on time, grab the premade cookie dough from the grocery store and use that instead!
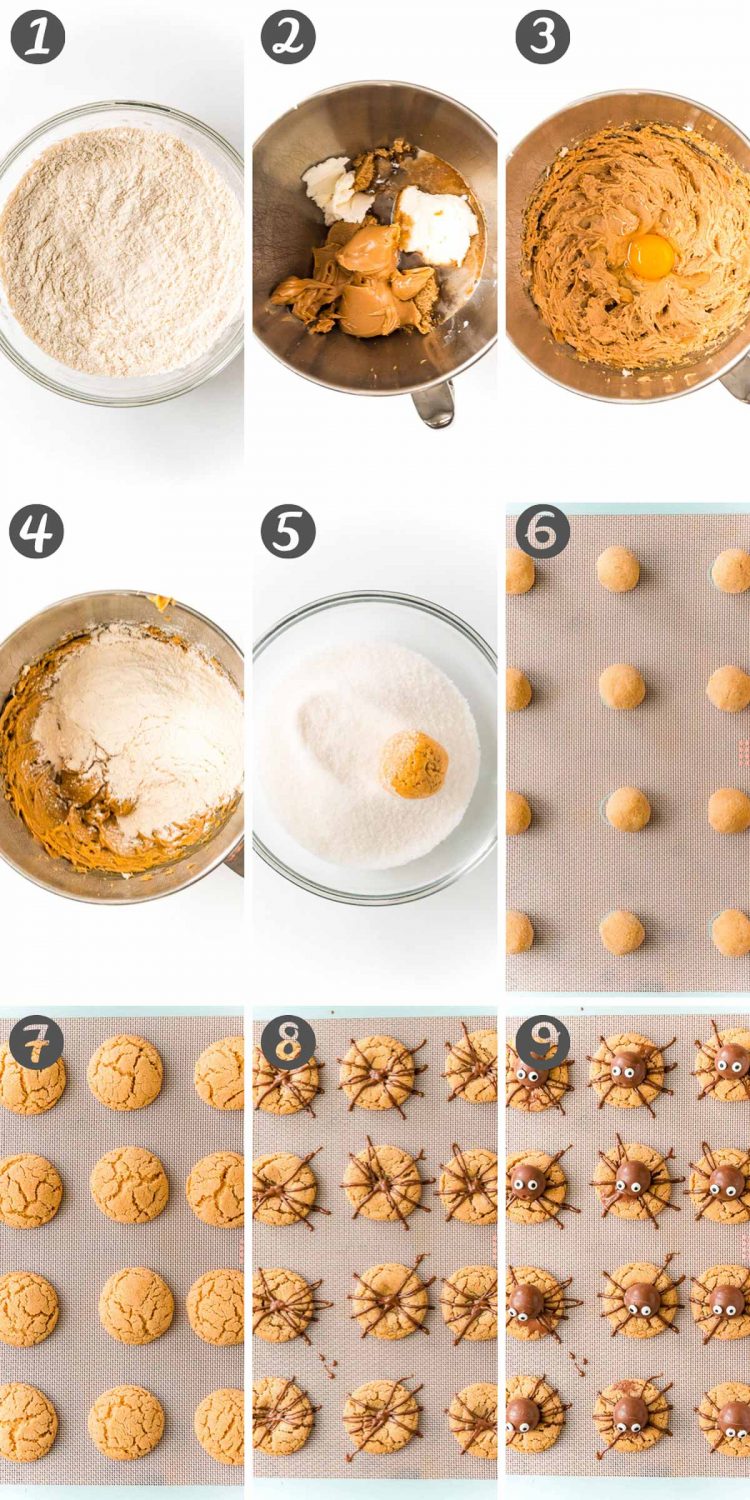
How To Make Spider Cookies
1. In a medium bowl, whisk together the flour, baking soda, and salt. Set aside.
2. Cream together the shortening, peanut butter, brown sugar, milk, and vanilla with an electric mixer on medium speed.
3. Add in the egg and beat just until combined.
4. Add in the flour mixture all at once and mix just until combined.
5. Use a medium cookie scoop to portion out the dough. Roll each scoop into a ball and roll it in granulated sugar before placing on the baking sheet at least 2 inches apart.
6. Bake the cookies for 9 to 10 minutes, the edges should be firm but the centers will be slightly puffy and soft. Remove from the oven and use the back of a round teaspoon to indent the center of each cookie.
7. Transfer to a wire cooling rack and allow the cookies to cool completely. If you don’t allow them to cook then the candies can melt and create big chocolate puddles.
8. Melt the chocolate wafers on 30-second intervals in the microwave and then transfer to a piping bag fitted with a #2 round tip. Make the spider legs on the cookies by starting from the outside and going back to the center 8 times to create 8 legs. I recommend doing this on wax or parchment paper for easy cleanup.
9. Then place a truffle in the center of each cookie. Use the melted chocolate to carefully stick the candy eyes to the truffles.
Super yum! Thanks for sharing this cute and spooky treat recipe!
– Kim

More Delicious Halloween Recipes
- Blood Bag Cocktail – A 2-ingredient drink that brings lots of spooky fun!
- Melted Witch Cupcakes – Cute, delicious cupcakes kids will love!
- Shrunken Head Punch – Complete with baked apple shrunken heads!
- Blood and Guts Cocktail – Made with Jello, vodka, lemon lime soda, and grenadine!
Did You Make This Recipe?
If you’ve tried this recipe, please let leave a review in the comments below. I love hearing from you! Don’t forget to tag me – @sugarandsoulco – on Instagram and Pinterest with your photos, or join our Sugar & Soul Show-offs Community and share them there.

Peanut Butter Spider Cookies
Ingredients
- 1¼ cups light brown sugar
- ¾ cup peanut butter
- ½ cup vegetable shortening
- 3 tablespoons whole milk
- 1 teaspoon vanilla extract
- 1 large egg
- 1¾ cups all-purpose flour
- ¾ teaspoon baking soda
- ¾ teaspoon kosher salt
- ½ cup granulated sugar
- 1 cup chocolate melting wafers
- 36 Lindt truffles1
- 72 candy eyes
Instructions
- Preheat the oven to 375°F and line a large baking sheet with parchment paper or a silicone baking mat and set aside.
- In a medium bowl, whisk together the flour, baking soda, and salt. Set aside.
- In a large bowl with a hand mixer or stand mixer fitted with a whisk attachment, cream together the shortening, peanut butter, brown sugar, milk, and vanilla on medium speed.
- Add in the egg and beat just until combined.
- Add in the flour mixture all at once and mix just until combined.
- Use a medium cookie scoop to portion out the dough. Roll each scoop into a ball and roll it in granulated sugar before placing on the baking sheet at least 2 inches apart.
- Bake the cookies for 9 to 10 minutes, the edges should be firm but the centers will be slightly puffy and soft. Remove from the oven and use the back of a round teaspoon to indent the center of each cookie. Transfer to a wire rack and allow the cookies to cool for 20 minutes.
- Melt the chocolate wafers on 30-second intervals in the microwave and then transfer to a piping bag fitted with a #2 round tip. Make the spider legs on the cookies by starting from the outside and going back to the center 8 times to create 8 legs. I recommend doing this on wax or parchment paper for easy cleanup.
- Then place a truffle in the center of each cookie and use the melted chocolate to carefully stick the candy eyes to the truffles.
Notes
- Reese’s peanut butter cups may also be used, insert them upside down on the cookie.
- Cookies should be stored in an airtight container for up to 5 days.
- Cookie dough can be stored in an airtight container in the fridge for up to 3 days before baking. If dough is cold going into the oven, bake for 1 additional minute than normal.
- Nutritional information is an estimate and does not include truffles.
- Recipe adapted from Hersheys.
Nutrition
Did You Make This Recipe?
Don’t forget to share it with me on Instagram @sugarandsoulco and follow on Tiktok @sugarandsoulco and Pinterest @sugarandsoulco for more!

Share your thoughts!
Love this recipe? Share your thoughts with me and leave a review! And don’t forget to connect on your favorite social platform below!



















Super yum! Thanks for sharing this cute and spooky treat recipe!