
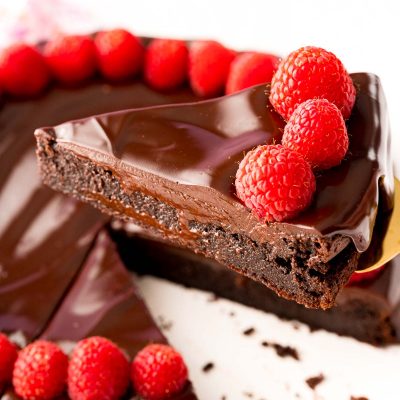
Flourless Chocolate Torte with Ganache


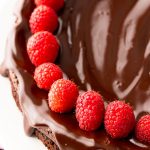

This Flourless Chocolate Cake recipe only requires ingredients you likely already have in your pantry and refrigerator! And it’s sure to impress any chocolate lover with its fudge-like texture that’s rich with flavor!
Why you’ll love this Chocolate Flourless Cake
I love this Flourless Chocolate Cake recipe because of how simple it is to make and how ridiculously delicious it is! Even though this is a dessert you often find at fancy restaurants, it doesn’t require any special skills, equipment, or ingredients! And it takes less than 1 hour to make start to finish!
What is Flourless Chocolate Cake?
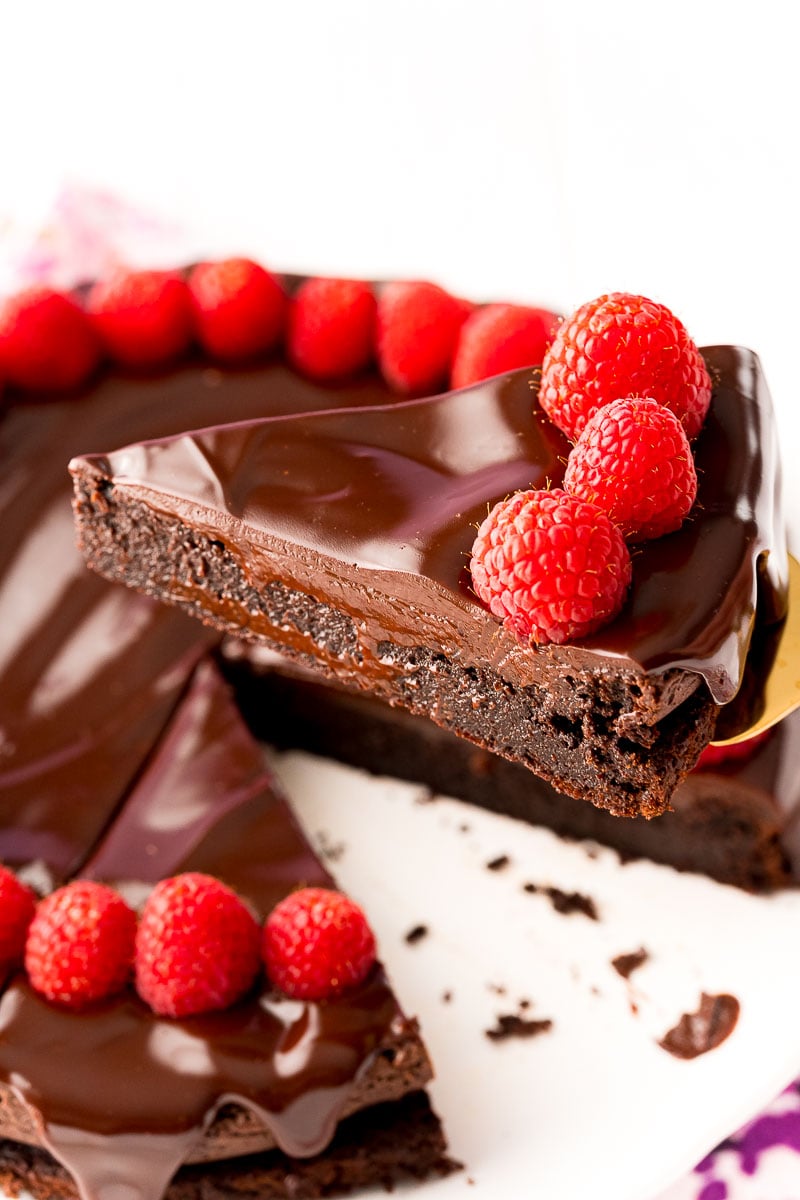
This cake walks the line between cake and brownie. It is rich, dense, and fudgy like a brownie but delicate like a cake. Made without flour and leavening agents, this cake gets it’s structure from the eggs and sugar in the batter.
Often served chilled or at room temperature, this cake is unlike a lot of others and in the best possible way! It’s truly a chocolate lovers dream!
Rebecca’s Recipe Review
Taste: Rich chocolate.
Texture: Fudge-like.
Ease: 3/10
Pros: A naturally gluten-free treat that’s made with ingredients you already have in the pantry and the refrigerator!
Cons: I tested this recipe for three weeks and can tell you that even the smallest changes to the recipe make a big difference. So follow the recipe to a T for best results!
Would I Make This Again? Yes!
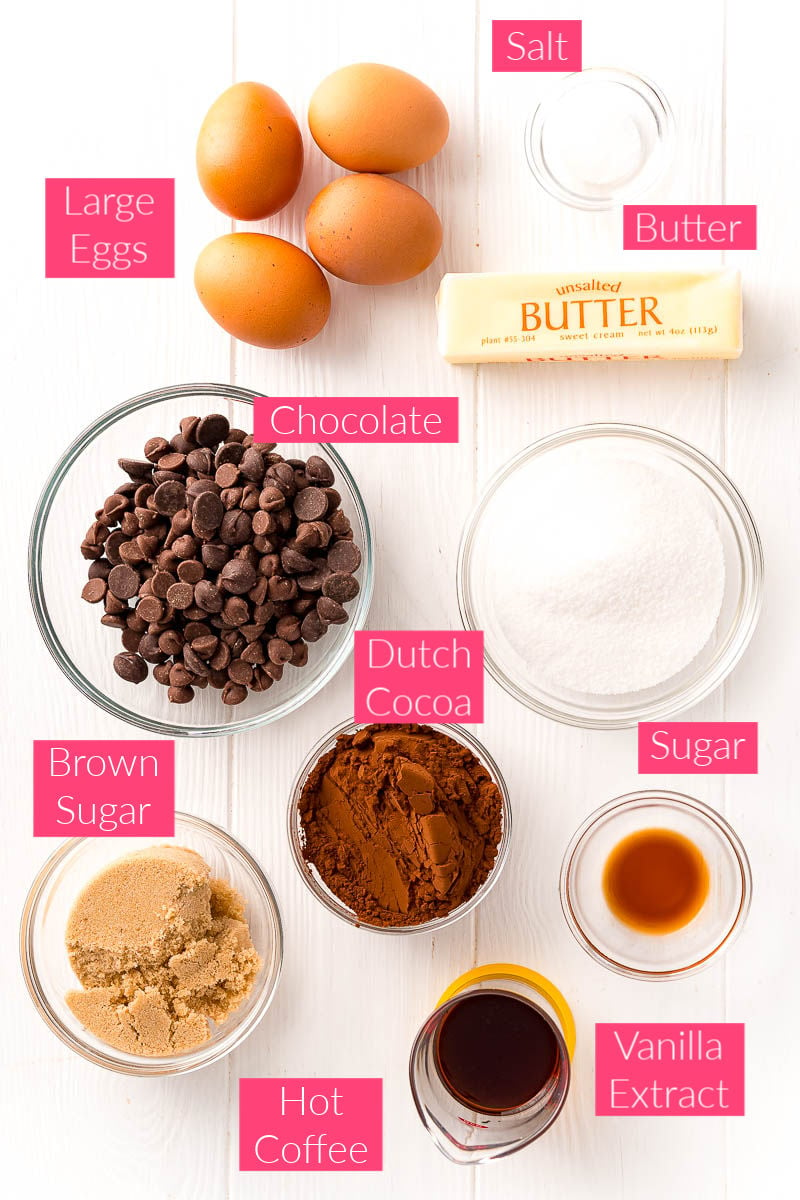
Best Flourless Chocolate Cake Ingredients
- Chocolate – You can’t have a chocolate cake without chocolate! In this case, I chose to use chocolate chips and for the best flavor, I used a blend of milk and dark chocolate. Use high-quality chocolate for the best results. I like Ghirardelli, Godiva, and Guittard.
- Butter – Make sure to use unsalted butter in this recipe, this gives you full control over the amount of salt within the recipe. It’s also important to make sure the butter is completely melted. Melted butter loses the ability to cream and hold air when beaten, this is part of how we achieve that delicious fudge-like texture in the flourless chocolate cake.
- Sugar – In this recipe, you’ll find both granulated sugar and light brown sugar. These are to add sweetness and flavor to the recipe. You could also use dark brown sugar for a deeper flavor.
- Vanilla – Another flavor factor in this cake, you can use extract or paste.
- Eggs – You might think that chocolate is the backbone of this recipe, but you’d be wrong. It’s the eggs. I tested this recipe with 3 eggs, 4 eggs, egg yolks, and a couple of other combos. 4 large eggs are definitely the way to go. Eggs add moisture, fat, and help replace the flour by acting as an emulsifier in the recipe and solidifying a fudgy, smooth texture.
- Coffee – I tested this recipe with espresso powder and hot water and hot coffee and the coffee route had a much better flavor. And it also results in a simpler recipe since most don’t have espresso powder in the pantries. Coffee helps intensify the chocolate flavor, but the cake will not taste like coffee.
- Cocoa Powder – Another layer of chocolate never hurt anyone, amirite? I used Dutch-process cocoa powder in this recipe, but unsweetened cocoa powder may also be used if that’s what you have on hand.
- Salt –It’s actually a really important ingredient in baked goods. It helps highlight the flavor and offset the sweetness for a more palatable bite.
Chocolate Flourless Cake Substitutions
- I like to use a mix of half milk chocolate and half dark chocolate chips for a deeper flavor. However, any combination of chocolate chips may be used.
- If you prefer to use baking chocolate instead of chocolate chips, you’ll want to use 6 ounces.
- Dark brown sugar may be used instead of light for a deeper molasses flavor.
- If you do not have coffee or prefer not to use it in your recipes, you can use hot water instead. The flavor will change slightly, but it will still be delicious.
- Regular unsweetened cocoa powder can be used, but I thought the test cakes with Dutch-process turned out better flavor-wise. Because there’s no leavening agent used in the cake, it doesn’t matter as much which one you use.
It was so easy and a huge hit!!
– Karen
How To Make Flourless Chocolate Cake with Ganache
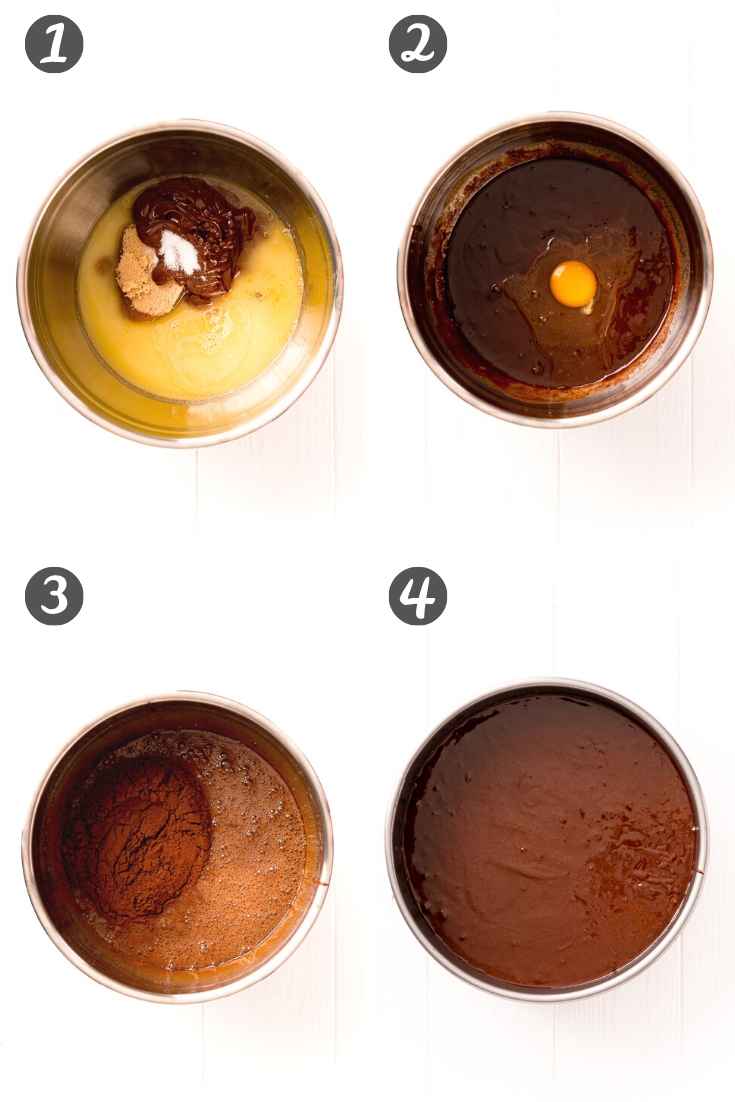
- Begin by melting the chocolate and butter separately. Then, add it to a large mixing bowl with the sugars, vanilla, and salt.
- Mix in the eggs one at a time. Beat each one until no yolk is visible before adding the next.
- Beat in the cocoa powder at medium speed just until combined.
- Add to a greased and parchment-lined cake pan and bake in an oven preheated to 350 degrees F until done.
Rebecca’s Tips For The Best Flourless Cake
- Make sure to pull your eggs out of the fridge at least 30 minutes before you begin mixing the batter. Room temperature eggs will mix better and give the cake more lift, which is important since this cake doesn’t contain flour or leavening agents.
- Make sure to use a 9-inch round cake pan. I tested the recipe in an 8-inch cake pan, and it came very close to the top when baking, and it could spill over. A springform pan may also be used.
- The cake is done when it has very little wiggle when moved, and a toothpick comes *almost* clean from the center. If it comes clean, pull it out, as it is overcooked.
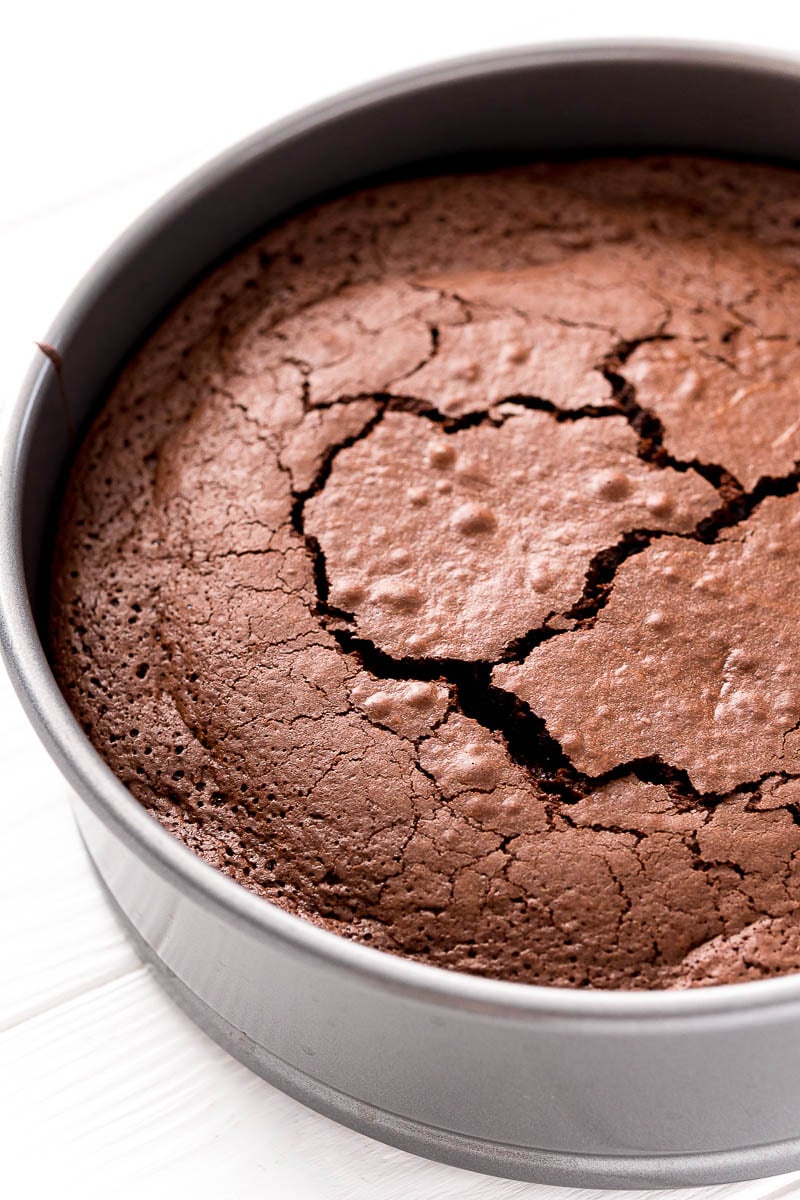
- The cake will have some cracking on the top – this is perfectly normal.
- The cake will sink after being out of the oven for a few minutes – this is expected.
- Once refrigerated, the cake will harden. If you do need to chill it, remove it 2 to 3 hours before serving so that it may soften a bit.
Storage Instructions For Flourless Chocolate Cake
You can store this cake at room temperature for 2 days or in the refrigerator for 4 days.
How To Freeze Flourless Chocolate Torte with Ganache
Bake the cake according to the directions and allow it to cool completely. Wrap it in plastic wrap and aluminum foil and place it in a 2-gallon freezer bag. Then transfer it to the freezer to store for 4 months.
When you’re ready to thaw, unwrap the cake and leave it at room temperature. Add toppings once thawed.
Why Did My Cake Sink?
Again, you should expect your cake to sink after being removed from the oven. And once it does, any cracks will look very minor!
Why Did My Cake Crack?
It’s normal for a flourless chocolate torte to crack. There are some recipes that call for straining the batter before adding it to the pan to get rid of the bubbles. But honestly, who has time for that?
A few things you can do to reduce cracking is to use a whisk instead of a hand mixer or stand mixer. You can also tap out some of the bubbles in the batter by gently tapping the pan on the counter before placing in the oven.
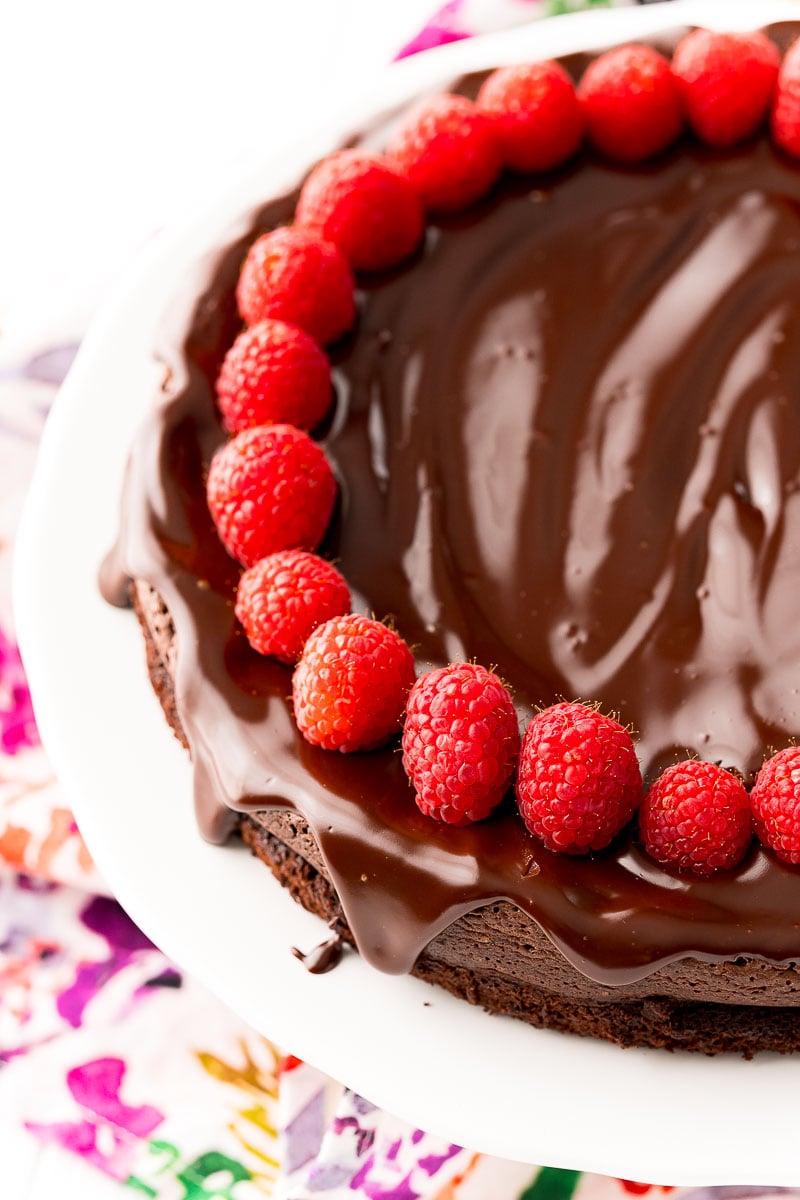
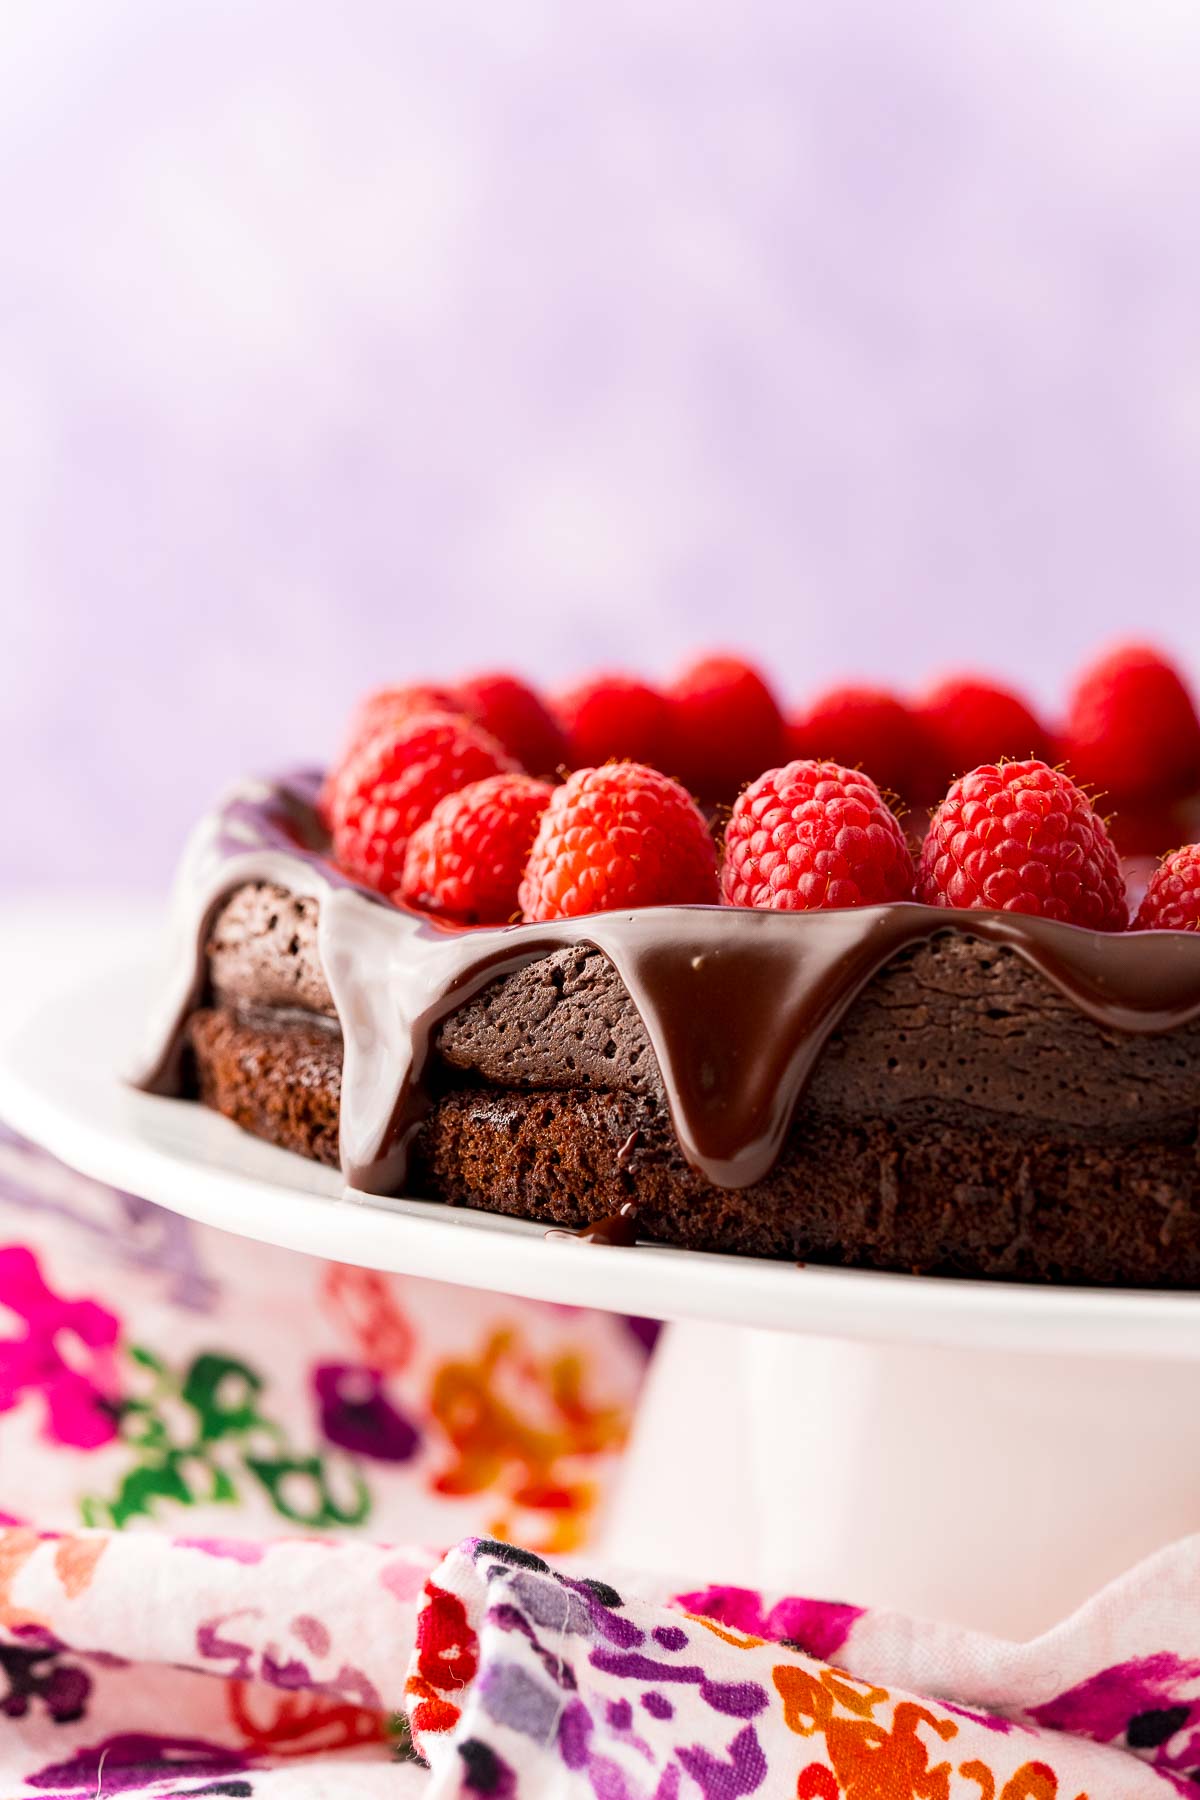
Cracks are easily covered by Ganache or Whipped Cream if you choose to use it!
You can see that my cake had fairly large cracks in it straight out of the oven in the image below.
Is gluten free and flourless the same?
Yes and no. This cake is flourless, but if you want to make sure it’s 100% gluten free, you’ll need to ensure that all of the other ingredients are too. However, the ingredients in this recipe are generally all considered naturally gluten-free.
How do you get flourless cake out of a pan?
This cake is made in a springform pan and all you need to do is remove the sides when you’re ready to enjoy. This cake is dense and fudgy, but still a bit delicate do I don’t not recommend trying to transfer it from the bottom of the pan unless you are taking it slice by slice.
You could use a traditional round cake pan, but I recommend spraying with nonstick spray and lining the bottom of the pan with parchment paper before adding the batter. Then bake, run a knife around the edge of the pan after baking, and let it cool completely in the pan, even chilling it in the fridge will help, and then gently flip it onto a plate and then back onto another plate.
More Chocolate Recipes!
- Black Magic Chocolate Cake – A decadent dessert that’s wrapped in chocolate buttercream!
- Chocolate Cupcakes – Made with an adapted boxed cake mix for an easy, go-to recipe!
- Irish Cream Cake – A grown up dessert that’s deliciously boozy!
- Mint Chocolate Truffles – An easy 4-ingredient treat that requires no baking!
Did You Make This Recipe?
If you’ve tried this recipe, please let leave a review in the comments below. I love hearing from you! Don’t forget to tag me – @sugarandsoulco – on Instagram and Pinterest with your photos, or join our Sugar & Soul Show-offs Community and share them there.
Flourless Chocolate Torte with Ganache
Ingredients
- 1 cup chocolate chips1
- ½ cup unsalted butter
- ½ cup granulated sugar
- ½ cup light brown sugar2
- 1 teaspoon vanilla extract
- ¼ teaspoon kosher salt
- ¼ cup hot coffee3
- 4 large eggs4 room temperature
- ½ cup Dutch-process cocoa powder5
- 1 batch Chocolate Ganache Recipe optional
- raspberries optional
- powdered sugar optional
Instructions
- Preheat oven to 350°F and line a 9-inch round cake pan6 with parchment paper and grease with non-stick spray.
- Melt chocolate and butter separately on the microwave on 30-second intervals, stirring between each one. Add them to a large mixing bowl along with the sugars, vanilla, salt, and coffee. Mix until fully combined.
- Add the eggs one at a time whisking between each addition until no yolk is visible.
- Whisk in the cocoa powder until completely combined.
- Pour the batter into the prepared cake pan and bake for 30 to 32 minutes, a toothpick or cake tester should come out mostly clean with some crumb/chocolate.7,8
- Remove from the oven and allow to cool completely in the pan before gently inverting onto a plate or cake stand.9
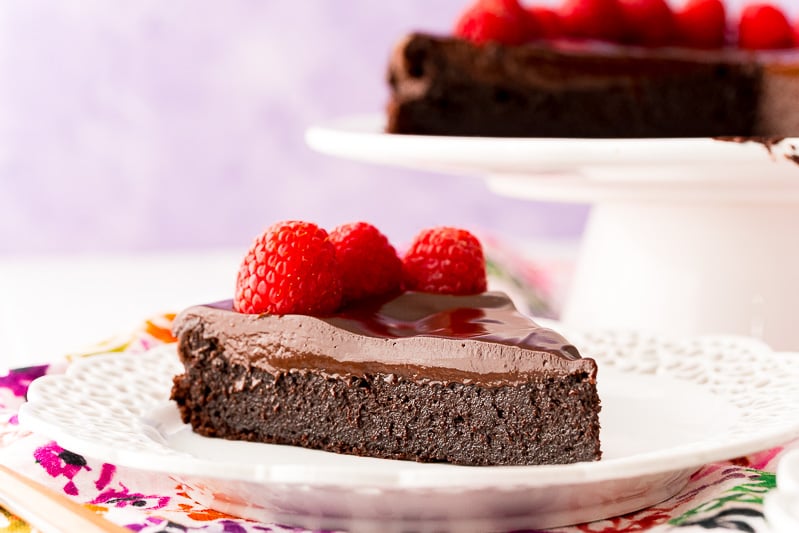
- Serve with raspberry filling, chocolate ganache, whipped cream, powdered sugar, and/or fresh fruit or store for future enjoyment.10,11,12
Video
Notes
- I like to use a mix of half milk chocolate and half dark chocolate chips for deeper flavor. However, any combination of chocolate chips may be used.
- Dark brown sugar may be used instead of light for a deeper molasses flavor.
- If you do not have coffee or prefer not to use it in your recipes, you can use hot water instead. The flavor will change slightly but it will still be delicious.
- Make sure to pull your eggs out of the fridge at least 30 minutes before you being mixing the batter. Room temperature eggs will mix better and give the cake more lift which is important since this cake doesn’t contain flour or leavening agents.
- Regular cocoa powder can be used but I thought the test cakes with Dutch-process turned out better flavor-wise.
- Make sure to use a 9-inch round cake pan. I tested the recipe in an 8-inch cake pan and it came very close to the top when it rose and it could spill over. A springform pan may also be used.
- The cake is done when it has very little wiggle when moved and a toothpick comes *almost* clean from the center. If it come clean, pull it out, as it is overcooked.
- The cake will have some cracking on the top, this is perfectly normal.
- The cake will sink after being out of the oven a few minutes, this is expected.
- Once refrigerated, the cake will harden. If you do need to chill it, remove it 2 to 3 hours before serving so that it may soften a bit.
- Shelf Life:
- Room Temperature: 2 days
- Refrigerator: 4 days
- Freezer: 4 months
- How To Freeze: Bake the cake according to the directions and allow it to cool completely. Wrap it in plastic wrap and aluminum foil and place it in a 2-gallon freezer bag. When you’re ready to thaw, unwrap the cake and leave at room temperature. Add toppings once thawed.
Nutrition
Did You Make This Recipe?
Don’t forget to share it with me on Instagram @sugarandsoulco and follow on Tiktok @sugarandsoulco and Pinterest @sugarandsoulco for more!
Share your thoughts!
Love this recipe? Share your thoughts with me and leave a review! And don’t forget to connect on your favorite social platform below!


Made this cake for the first time yesterday for a pre-Christmas dinner. It was a hit! So easy to make. Mine luckily did not crack. One tip: use a hand whisk to mix/blend rather than an electric hand mixer, less air gets into it.
Is the cook time right on this recipe? I’m baking at 350° in a convection oven and it’s been in for 40 minutes and it’s not even close to being done. Am I doing something wrong? 🙃
Ok, it took 45 minutes in a 9” springform pan. I panicked 😆 it’s a birthday cake and you know how stressful that can be
I’m glad it worked out!
It was so easy and a huge hit!!
Wondering if you can sub cacao for cocoa and if so, would it be the same measurements? Thanks!
Hi Kelly, you can substitute with an even amount. It might change the flavor slightly though.